How to Use FluentValidation in ASP.NET Core: Write Powerful and Clean Validations
Learn how to use FluentValidation in ASP.NET Core to build clean and powerful validation logic. Understand why it’s better than Data Annotations with real examples and step-by-step setup.
Every API you build has a bouncer at the door. That bouncer's job is to look at incoming requests and decide: does this data deserve to get in, or does it go straight back with an error message?
In ASP.NET Core, most developers start with Data Annotations for that job. Slap a [Required] here, an [EmailAddress] there, and you're done. It works. And honestly, for a small demo project or a two-endpoint prototype, it works just fine.
But here's what happens the moment your project grows: your model classes start looking like a Christmas tree. Attributes stacked on attributes. Validation rules tangled up with your data shape. Logic you can't test in isolation, can't reuse, and can't touch without risking something unrelated breaking. The bouncer is now also doing the job of the coat check, the bartender, and the manager.
That's where FluentValidation comes in. It gives you a dedicated, separate place for your validation logic, written in a style that reads almost like plain English. In this guide, you'll learn how to set it up in ASP.NET Core 8, write validators that cover real-world scenarios, and keep your codebase clean while doing it.
Why Your Model Shouldn't Carry Validation Weight
Before jumping to code, it's worth understanding what's actually wrong with the annotation approach for larger projects. Consider a typical user registration model:
public class RegisterUserRequest
{
    [Required]
    [MinLength(3)]
    public string? Username { get; set; }

    [Required]
    [EmailAddress]
    public string? Email { get; set; }

    [Required]
    [MinLength(8)]
    [RegularExpression(@"^(?=.*[A-Z])(?=.*\d).+$", ErrorMessage = "Password must contain at least one uppercase letter and one number.")]
    public string? Password { get; set; }

    [Compare("Password", ErrorMessage = "Passwords do not match.")]
    public string? ConfirmPassword { get; set; }
}
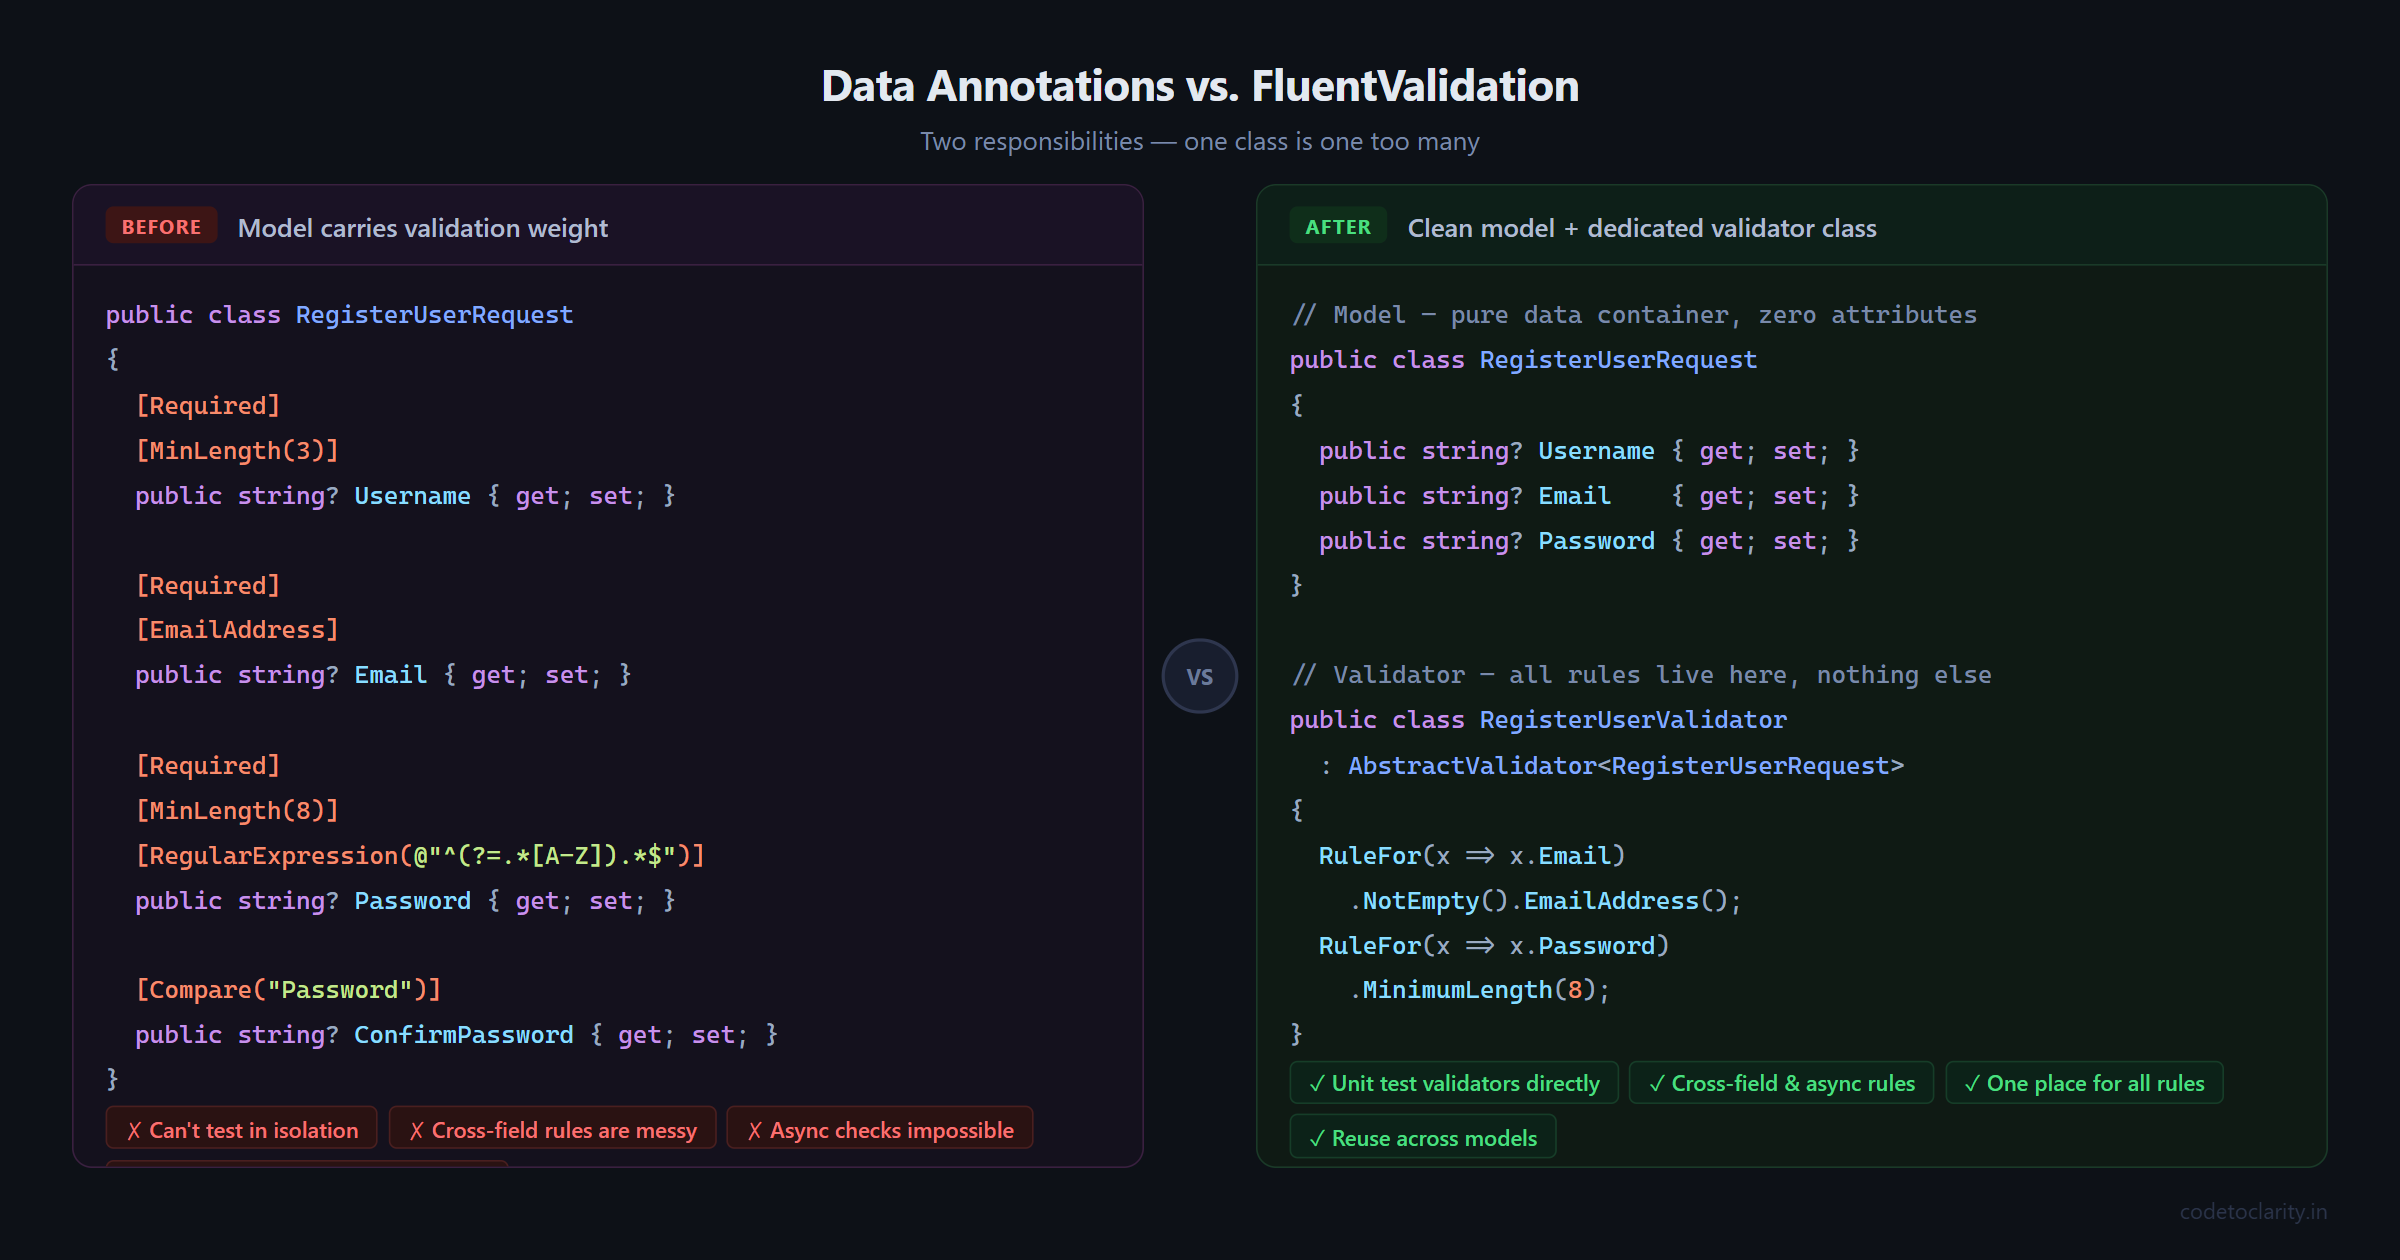
That model is doing two things at once. It describes the shape of the data and it enforces business rules about that data. These are separate responsibilities, and mixing them creates a few real problems:
You can't test validation logic in isolation. If you want to unit test your validation rules, you have to instantiate the whole model and run it through the model state pipeline. There's no clean way to say "just run the validators."
Reusing or changing rules is painful. Say you need slightly different password rules for an admin registration versus a regular user. With annotations, you either duplicate the model or build awkward workarounds.
Cross-field rules are a mess. Comparing two fields, validating one field based on the value of another, or running database checks during validation simply cannot be expressed with annotations in a clean way.
FluentValidation solves all of this by moving validation into its own class. Your model stays a pure data container, and the validator handles all the rules.
Getting FluentValidation Set Up
Start by installing the library. You'll need the core package and the dependency injection extensions. Open your Package Manager Console and run:
Install-Package FluentValidation
Install-Package FluentValidation.DependencyInjectionExtensions
Or via the .NET CLI:
dotnet add package FluentValidation
dotnet add package FluentValidation.DependencyInjectionExtensions
One important note: The older
FluentValidation.AspNetCorepackage, which provided automatic model-binding integration, is deprecated. The recommended approach today is to inject the validator and call it manually. This is actually a good thing, as it gives you more control and works seamlessly with Minimal APIs and async rules.
You can check the official FluentValidation NuGet page to confirm you're using the latest stable version.
Your First Validator
Let's build a clean user registration flow for a fictional app called CodeToClarity. First, the request model, which stays completely clean with no attributes:
public class RegisterUserRequest
{
    public string? Username { get; set; }
    public string? Email { get; set; }
    public string? Password { get; set; }
    public string? ConfirmPassword { get; set; }
}
Now create a Validators folder in your project and add a new class:
using FluentValidation;

public class RegisterUserValidator : AbstractValidator<RegisterUserRequest>
{
    public RegisterUserValidator()
    {
        RuleFor(x => x.Username)
            .NotEmpty().WithMessage("Username is required.")
            .MinimumLength(3).WithMessage("Username must be at least 3 characters.")
            .MaximumLength(30).WithMessage("Username cannot exceed 30 characters.");

        RuleFor(x => x.Email)
            .NotEmpty().WithMessage("Email is required.")
            .EmailAddress().WithMessage("Please enter a valid email address.");

        RuleFor(x => x.Password)
            .NotEmpty().WithMessage("Password is required.")
            .MinimumLength(8).WithMessage("Password must be at least 8 characters.");

        RuleFor(x => x.ConfirmPassword)
            .Equal(x => x.Password).WithMessage("Passwords do not match.");
    }
}
A few things to notice here. Each RuleFor call targets a single property. Rules chain together using method calls. Error messages are explicit and in one place. No attributes, no clutter on the model.
Registering Validators in Program.cs
You have two options for registering your validators with the dependency injection container.
Option 1: Register all validators in an assembly automatically
builder.Services.AddValidatorsFromAssemblyContaining<RegisterUserValidator>();
This scans the assembly and registers every class that inherits from AbstractValidator<T>. This is the approach most teams prefer because you never have to remember to register a new validator manually.
Option 2: Register a specific validator manually
builder.Services.AddScoped<IValidator<RegisterUserRequest>, RegisterUserValidator>();
Use this when you need precise control, such as registering a different validator depending on an environment or feature flag.
Using the Validator in an Endpoint
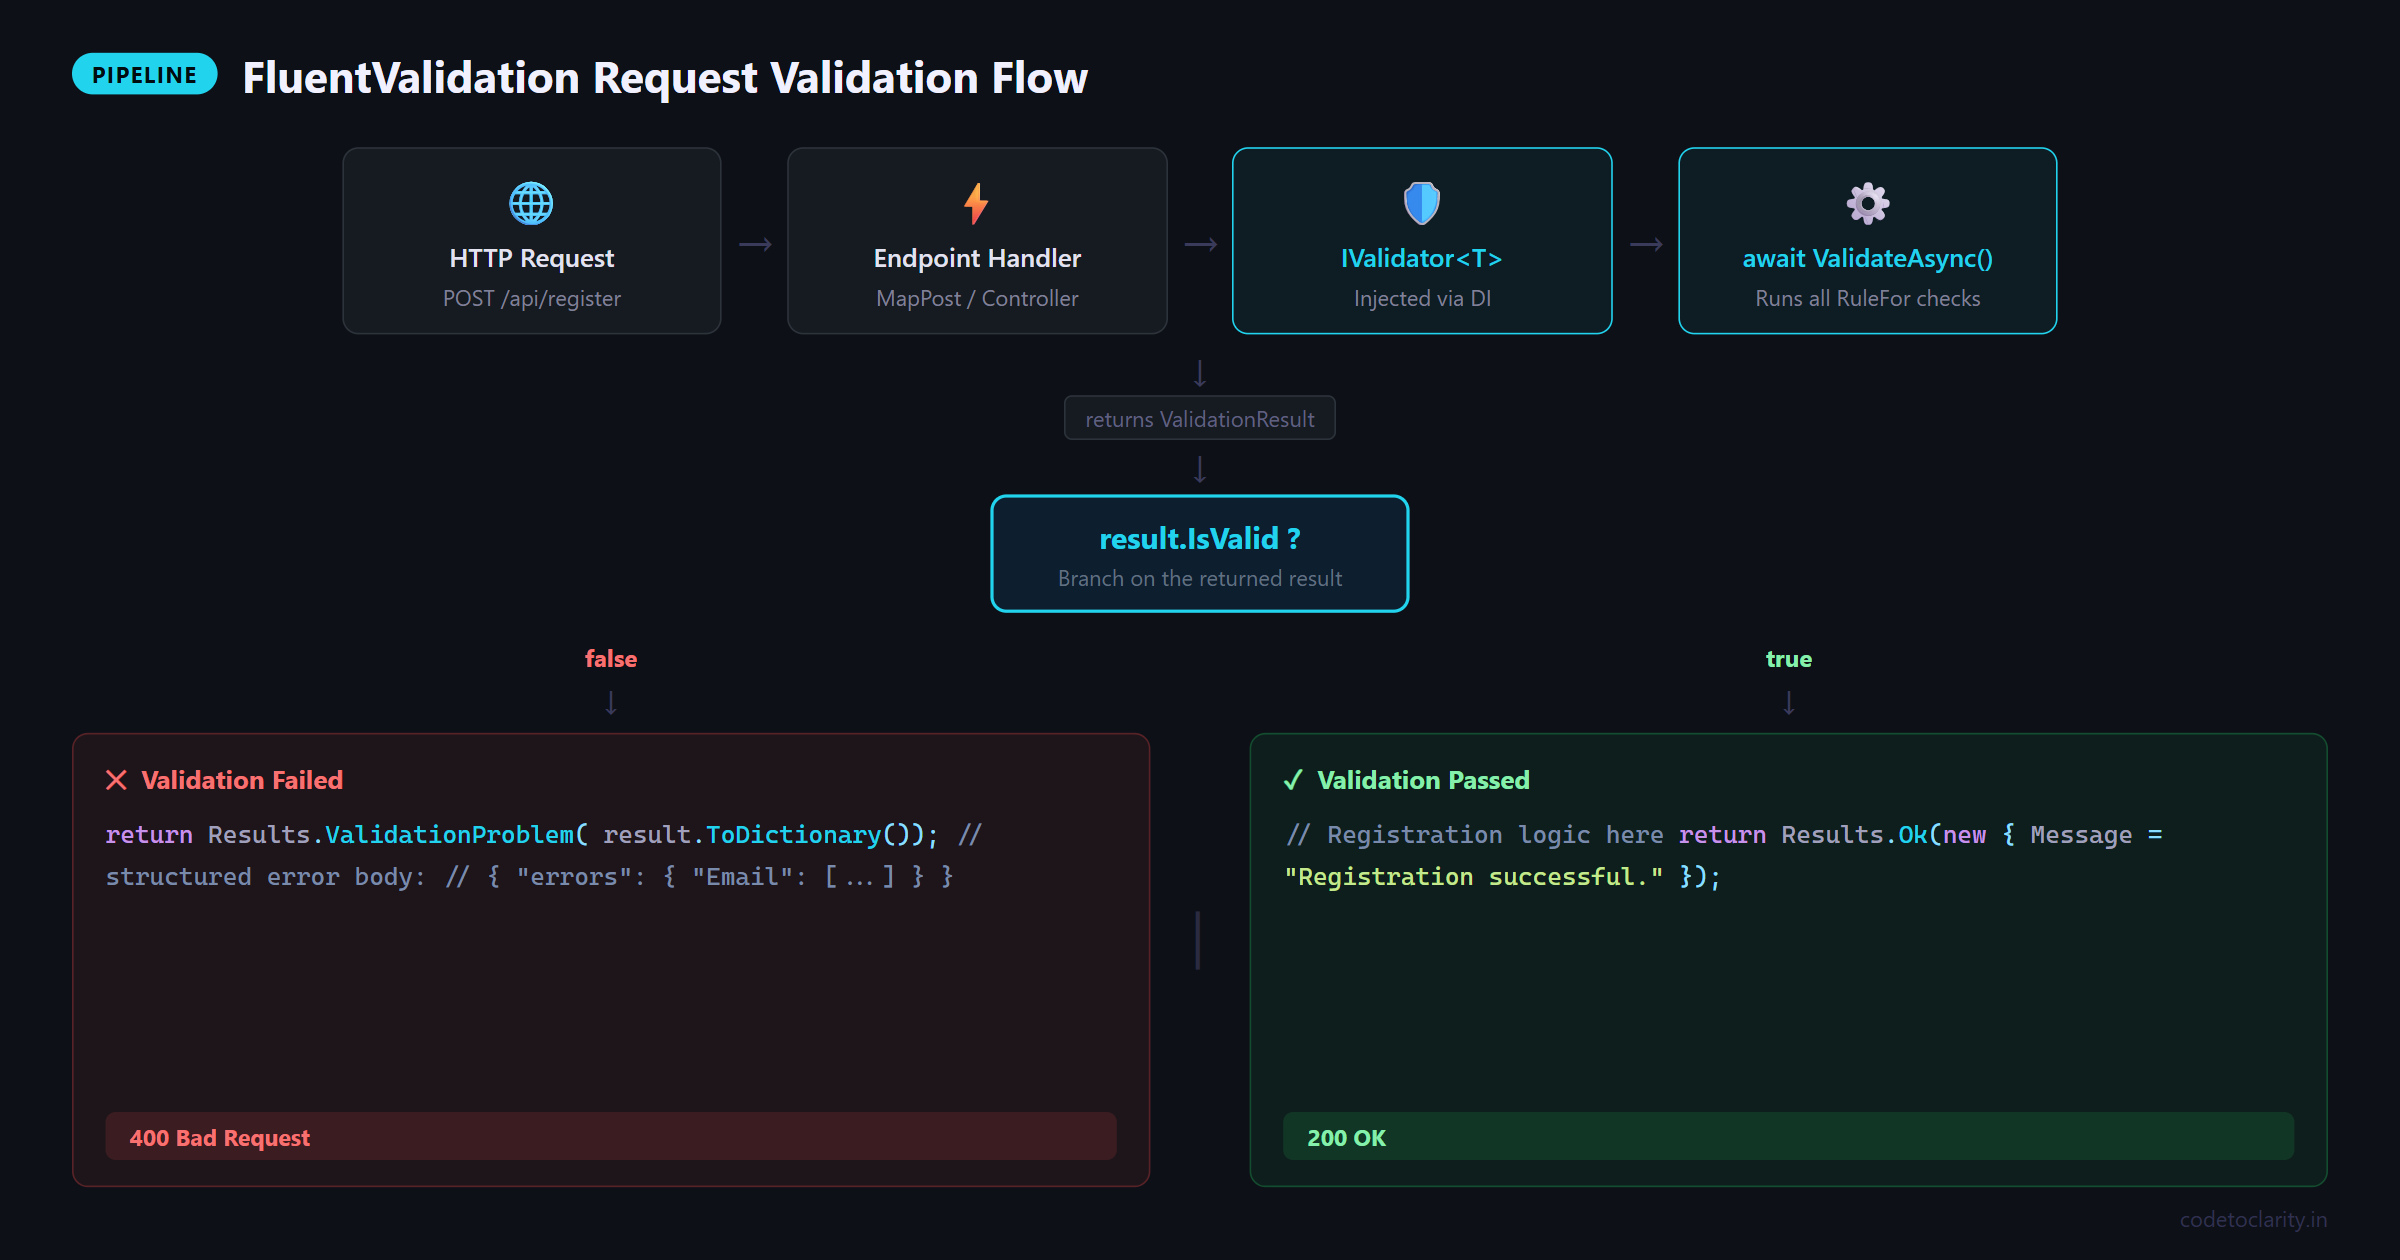
Here's how you use the validator inside a Minimal API endpoint. FluentValidation is injected like any other service:
app.MapPost("/api/codetoclarity/register", async (
    RegisterUserRequest request,
    IValidator<RegisterUserRequest> validator) =>
{
    var result = await validator.ValidateAsync(request);

    if (!result.IsValid)
        return Results.ValidationProblem(result.ToDictionary());

    // Registration logic here
    return Results.Ok(new { Message = "Registration successful." });
});
Send an invalid request and you'll get back a clean, structured error response:
{
  "errors": {
    "Email": ["Please enter a valid email address."],
    "Password": ["Password must be at least 8 characters."]
  }
}
If you're using a controller-based API instead, inject the validator through the constructor and call it the same way:
[ApiController]
[Route("api/[controller]")]
public class CodeToClarityController : ControllerBase
{
    private readonly IValidator<RegisterUserRequest> _validator;

    public CodeToClarityController(IValidator<RegisterUserRequest> validator)
    {
        _validator = validator;
    }

    [HttpPost("register")]
    public async Task<IActionResult> Register([FromBody] RegisterUserRequest request)
    {
        var result = await _validator.ValidateAsync(request);

        if (!result.IsValid)
            return BadRequest(result.Errors.Select(e => new { e.PropertyName, e.ErrorMessage }));

        return Ok("Registration successful.");
    }
}
Custom Rules with Must()
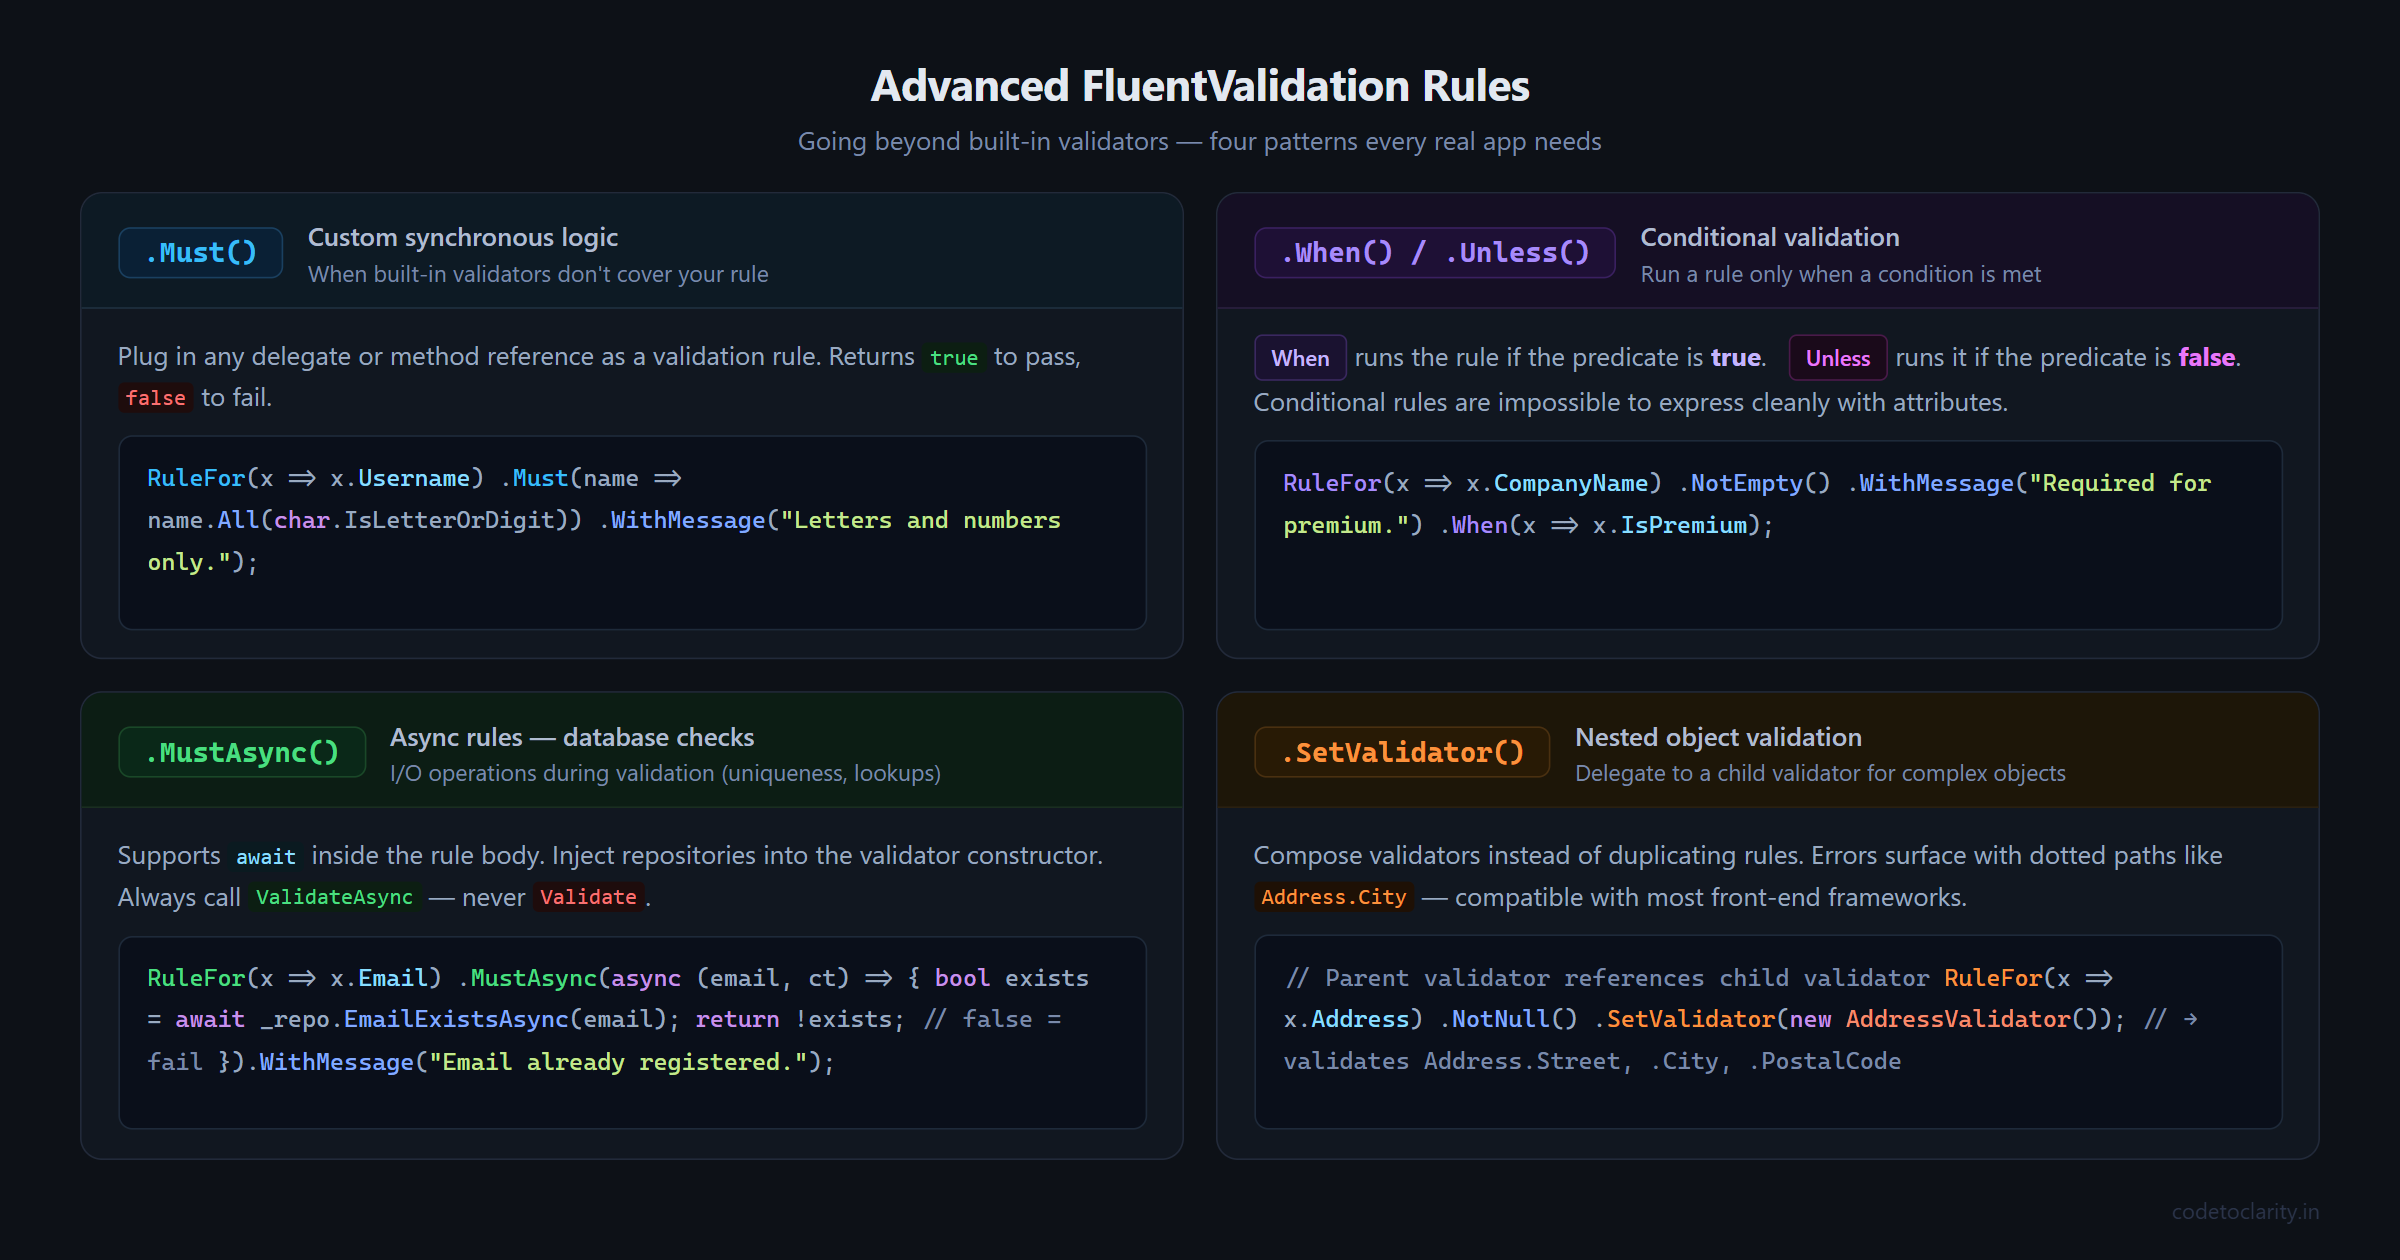
Sometimes the built-in validators aren't enough. FluentValidation's Must() method lets you plug in any custom logic as a delegate or a method reference.
Here's a rule that checks the username contains only letters and numbers, no spaces or special characters:
RuleFor(x => x.Username)
    .NotEmpty()
    .Must(name => name != null && name.All(char.IsLetterOrDigit))
    .WithMessage("Username can only contain letters and numbers.");
You can extract the logic into a private method to keep the constructor readable:
private bool IsAlphanumeric(string? value)
    => value != null && value.All(char.IsLetterOrDigit);

RuleFor(x => x.Username)
    .NotEmpty()
    .Must(IsAlphanumeric)
    .WithMessage("Username can only contain letters and numbers.");
Stopping Early with CascadeMode
By default, if a property fails multiple rules, FluentValidation runs all of them and returns every error. Sometimes that's helpful, but it can also lead to weird situations where you get "Email is required" and "Email is not a valid address" at the same time.
Use Cascade(CascadeMode.Stop) to stop checking further rules once one fails:
RuleFor(x => x.Email)
    .Cascade(CascadeMode.Stop)
    .NotEmpty().WithMessage("Email is required.")
    .EmailAddress().WithMessage("Please enter a valid email address.");
Now if the email field is empty, you'll only get the "required" message, which makes much more sense from a user experience standpoint.
Conditional Validation with When and Unless
Real applications often have conditional rules. For example, imagine the CodeToClarity platform allows both free and premium account registrations. Premium accounts require a company name, but free accounts don't.
public class RegisterUserRequest
{
    public string? Username { get; set; }
    public string? Email { get; set; }
    public string? Password { get; set; }
    public string? ConfirmPassword { get; set; }
    public bool IsPremium { get; set; }
    public string? CompanyName { get; set; }
}
RuleFor(x => x.CompanyName)
    .NotEmpty().WithMessage("Company name is required for premium accounts.")
    .When(x => x.IsPremium);
The When method takes a condition and only runs the rule when the condition is true. The Unless method works the opposite way, running the rule when the condition is false.
This kind of contextual validation is nearly impossible to express cleanly with attributes, but with FluentValidation it reads naturally.
Async Validation: Checking the Database
Here's one of the most powerful features FluentValidation offers: async rules. This is where things get genuinely useful for real applications.
Imagine you want to check that an email address isn't already registered before allowing sign-up. That check requires hitting the database, which is an I/O operation. FluentValidation supports this with MustAsync().
First, set up a simple interface for the data check:
public interface ICodeToClarityUserRepository
{
    Task<bool> EmailExistsAsync(string email, CancellationToken cancellationToken = default);
}
Then inject the repository into the validator and use MustAsync:
public class RegisterUserValidator : AbstractValidator<RegisterUserRequest>
{
    public RegisterUserValidator(ICodeToClarityUserRepository userRepository)
    {
        RuleFor(x => x.Email)
            .NotEmpty()
            .EmailAddress()
            .MustAsync(async (email, cancellationToken) =>
            {
                bool exists = await userRepository.EmailExistsAsync(email, cancellationToken);
                return !exists;
            })
            .WithMessage("This email address is already registered.");

        // Other rules...
    }
}
Two things to remember here. First, since the validator now has a constructor dependency, you need to make sure your DI registration handles that. If you use AddValidatorsFromAssemblyContaining, it will automatically resolve dependencies from the container, so no extra steps are needed.
Second, and this is important: when your validator contains async rules, always call ValidateAsync and never Validate. Calling the synchronous version with async rules will throw a runtime exception.
Per the official FluentValidation documentation on async validation, this rule is firm. Design your pipeline around ValidateAsync from the start and you'll never run into this issue.
Validating Nested Objects
As your request models grow, you'll often have objects inside objects. FluentValidation handles this gracefully with SetValidator.
Say the CodeToClarity registration includes an address:
public class AddressRequest
{
    public string? Street { get; set; }
    public string? City { get; set; }
    public string? PostalCode { get; set; }
}

public class RegisterUserRequest
{
    public string? Username { get; set; }
    public string? Email { get; set; }
    public AddressRequest? Address { get; set; }
}
Create a dedicated validator for the nested object:
public class AddressValidator : AbstractValidator<AddressRequest>
{
    public AddressValidator()
    {
        RuleFor(x => x.Street).NotEmpty().WithMessage("Street is required.");
        RuleFor(x => x.City).NotEmpty().WithMessage("City is required.");
        RuleFor(x => x.PostalCode).NotEmpty().WithMessage("Postal code is required.");
    }
}
Then reference it from the parent validator:
RuleFor(x => x.Address)
    .NotNull().WithMessage("Address is required.")
    .SetValidator(new AddressValidator());
Validation errors from the nested object will appear with dotted property names like Address.City in the response, which most front-end frameworks handle perfectly.
Unit Testing Your Validators
One of the biggest advantages of separating validation into its own class is testability. You can test your validators directly without spinning up a controller or an HTTP pipeline.
Using xUnit and the built-in FluentValidation test helpers:
public class RegisterUserValidatorTests
{
    private readonly RegisterUserValidator _validator = new RegisterUserValidator();

    [Fact]
    public void Should_Fail_When_Email_Is_Invalid()
    {
        var request = new RegisterUserRequest
        {
            Username = "testuser",
            Email = "not-an-email",
            Password = "SecurePass1",
            ConfirmPassword = "SecurePass1"
        };

        var result = _validator.Validate(request);

        Assert.False(result.IsValid);
        Assert.Contains(result.Errors, e => e.PropertyName == "Email");
    }

    [Fact]
    public void Should_Pass_When_All_Fields_Are_Valid()
    {
        var request = new RegisterUserRequest
        {
            Username = "codeuser",
            Email = "user@codetoclarity.in",
            Password = "SecurePass1",
            ConfirmPassword = "SecurePass1"
        };

        var result = _validator.Validate(request);

        Assert.True(result.IsValid);
    }
}
Compare this to testing Data Annotations, which requires you to manually trigger model validation through Validator.TryValidateObject or mock the whole MVC pipeline. This is cleaner by a wide margin.
When Data Annotations Are Still Fine
FluentValidation is not always the answer. If you're building a quick prototype, an internal tool, or a model with two or three straightforward required fields, Data Annotations will serve you perfectly well. They're built into the framework, require zero additional packages, and every .NET developer already knows them.
The real question to ask is: will this validation logic grow? Will I need async checks, conditional rules, or cross-field comparisons down the road? If the answer is yes, starting with FluentValidation is a much easier path than migrating later.
Wrapping Up
Validation is one of those topics that feels simple until you're knee-deep in a growing project wondering why your models look like they've been through a decoration explosion.
FluentValidation gives you a clear place for your rules, a readable syntax that your teammates will appreciate, full async support for real-world database checks, and validators that you can actually unit test like normal code. The initial setup is minimal, the payoff is significant, and the migration from Data Annotations is usually straightforward.
Your models should describe data. Your validators should protect it. Keep them separate, and your codebase will thank you.

Kishan Kumar
Software Engineer / Tech Blogger
A passionate software engineer with experience in building scalable web applications and sharing knowledge through technical writing. Dedicated to continuous learning and community contribution.