
Implementing Two-Factor Authentication (2FA) in .NET with TOTP and QR Codes
Learn how to implement Two-Factor Authentication (2FA) in .NET using TOTP, QR codes, and ASP.NET Core Minimal APIs. Covers the full setup flow, login flow, replay prevention, secret encryption, and recovery codes.
Passwords have a problem. They get phished. They leak in data breaches. People reuse them. People share them. A clever attacker does not even need to crack your password if they can just buy it for five dollars on a dark web forum.
Two-Factor Authentication (2FA) is not a silver bullet, but it is one of the most effective layers you can add to an authentication system. Even if someone gets hold of a user's password, they still cannot log in without the second factor sitting on a device the real user physically holds.
In this article, we are going to build 2FA from the ground up in .NET using TOTP (Time-based One-Time Passwords), the same algorithm powering apps like Google Authenticator and Authy. We will cover how TOTP works under the hood, how to generate QR codes for setup, how to structure the enrollment and login flows correctly, and how to handle all the security details that most tutorials skip over.
By the end, you will have a working, production-conscious implementation for your ASP.NET Core API.
How TOTP Actually Works
Before touching a single line of code, let us understand what is happening under the hood. Most developers treat TOTP as a black box. That is a mistake, because knowing how it works tells you exactly what to protect and why.
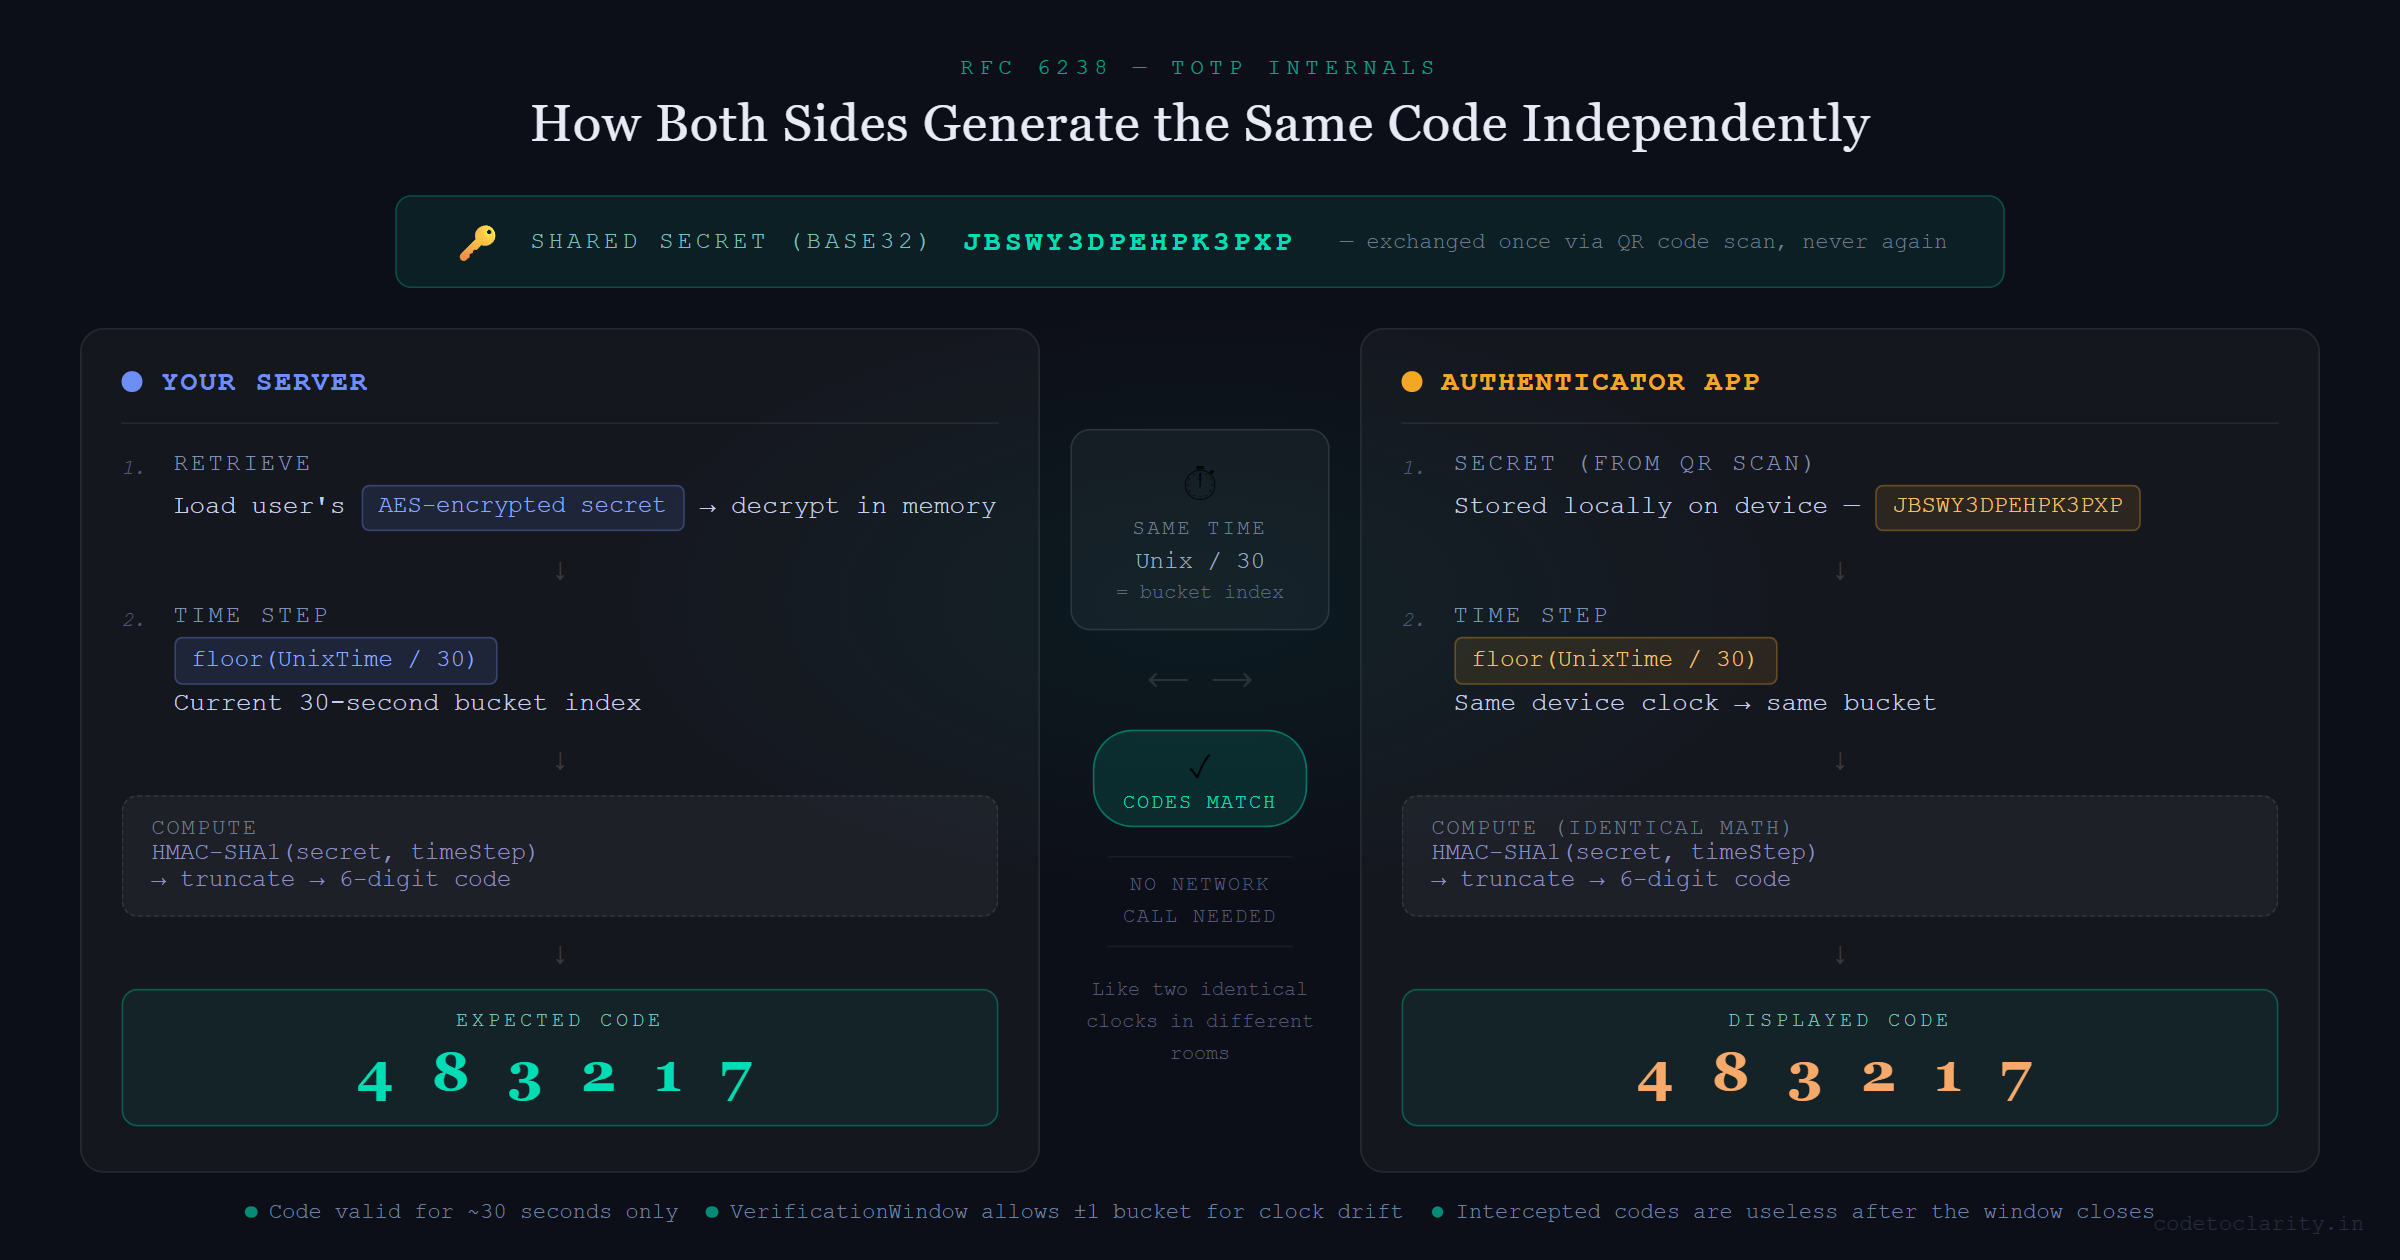
TOTP stands for Time-based One-Time Password and is standardized under RFC 6238. Here is the key insight: when a user sets up 2FA, your server generates a secret key and shares it with their authenticator app (via a QR code scan). From that moment on, both sides know the same secret.
When the user needs to authenticate, both the server and the authenticator app take that shared secret and combine it with the current Unix timestamp (divided into 30-second buckets) and run an HMAC-SHA1 operation on the combination. The result gets truncated into a 6-digit number. Because both sides do the exact same math at the same time, they arrive at the same 6-digit code independently, without any network call.
Think of it like two identical alarm clocks set to the same time in two different rooms. They always show the same time without talking to each other. TOTP is the same idea, just with cryptographic math replacing clock hands.
This design has two meaningful benefits. First, there is no server round-trip to "fetch" a code. Second, a code is only valid for about 30 seconds, so even if an attacker intercepts it, they have a very narrow window to use it.
Setting Up the Project
We need two NuGet packages:
dotnet add package Otp.NET
dotnet add package QRCoder
Otp.NET is a well-maintained, dependency-free library that implements both TOTP and HOTP per the RFC specs. QRCoder handles turning our setup URI into a scannable QR image.
Generating the User's Secret Key
Every user gets their own unique secret key. This is the cornerstone of the entire 2FA system. If this key leaks, an attacker can generate valid codes forever. Treat it with at least the same care as a password.
using OtpNet;

// Generate a cryptographically secure 20-byte key
byte[] secretBytes = KeyGeneration.GenerateRandomKey(20);

// Base32-encode it because the otpauth URI scheme requires Base32
string base32Secret = Base32Encoding.ToString(secretBytes);
The GenerateRandomKey call uses a cryptographically secure random number generator internally. The length of 20 bytes is the default and aligns with what the RFC and most authenticator apps expect.
Do not store this raw. We will encrypt it before it ever touches the database. More on that in a moment.
Building the QR Code Setup Endpoint
The user cannot manually type a 32-character Base32 string into their phone (well, they could, but nobody wants to). We generate a QR code that encodes a standard otpauth:// URI. Authenticator apps know how to parse this URI and automatically set everything up.
Here is what a complete setup endpoint looks like in an ASP.NET Core Minimal API:
app.MapPost("/2fa/setup", async (HttpContext context, IUserService userService) =>
{
    string userId = context.User.GetUserId();

    // Generate a fresh secret for this user
    byte[] secretBytes = KeyGeneration.GenerateRandomKey(20);
    string base32Secret = Base32Encoding.ToString(secretBytes);

    // Store it as PENDING, not active yet
    await userService.StorePendingSecret(userId, base32Secret);

    // Build the otpauth URI
    string issuer = Uri.EscapeDataString("CodeToClarity");
    string account = Uri.EscapeDataString(userId);

    string otpUri = $"otpauth://totp/{issuer}:{account}"
                  + $"?secret={base32Secret}"
                  + $"&issuer={issuer}"
                  + $"&digits=6"
                  + $"&period=30";

    // Generate the QR code image
    using var qrGenerator = new QRCodeGenerator();
    using var qrData = qrGenerator.CreateQrCode(otpUri, QRCodeGenerator.ECCLevel.Q);
    using var qrCode = new PngByteQRCode(qrData);
    byte[] qrImageBytes = qrCode.GetGraphic(10);

    return Results.File(qrImageBytes, "image/png");
})
.RequireAuthorization();
A few things worth noting here.
The ECCLevel.Q parameter controls error correction. At level Q, the QR code remains scannable even if about a quarter of it is obscured or damaged. That is a good balance between scan reliability and code density.
The period=30 and digits=6 parameters match what every major authenticator app defaults to. Do not change these unless you have a compelling reason and know that your target apps support the alternatives.
You can also display the raw base32Secret string alongside the QR code as a manual entry option. Some power users prefer it.
The Enrollment Flow: Why Order Matters
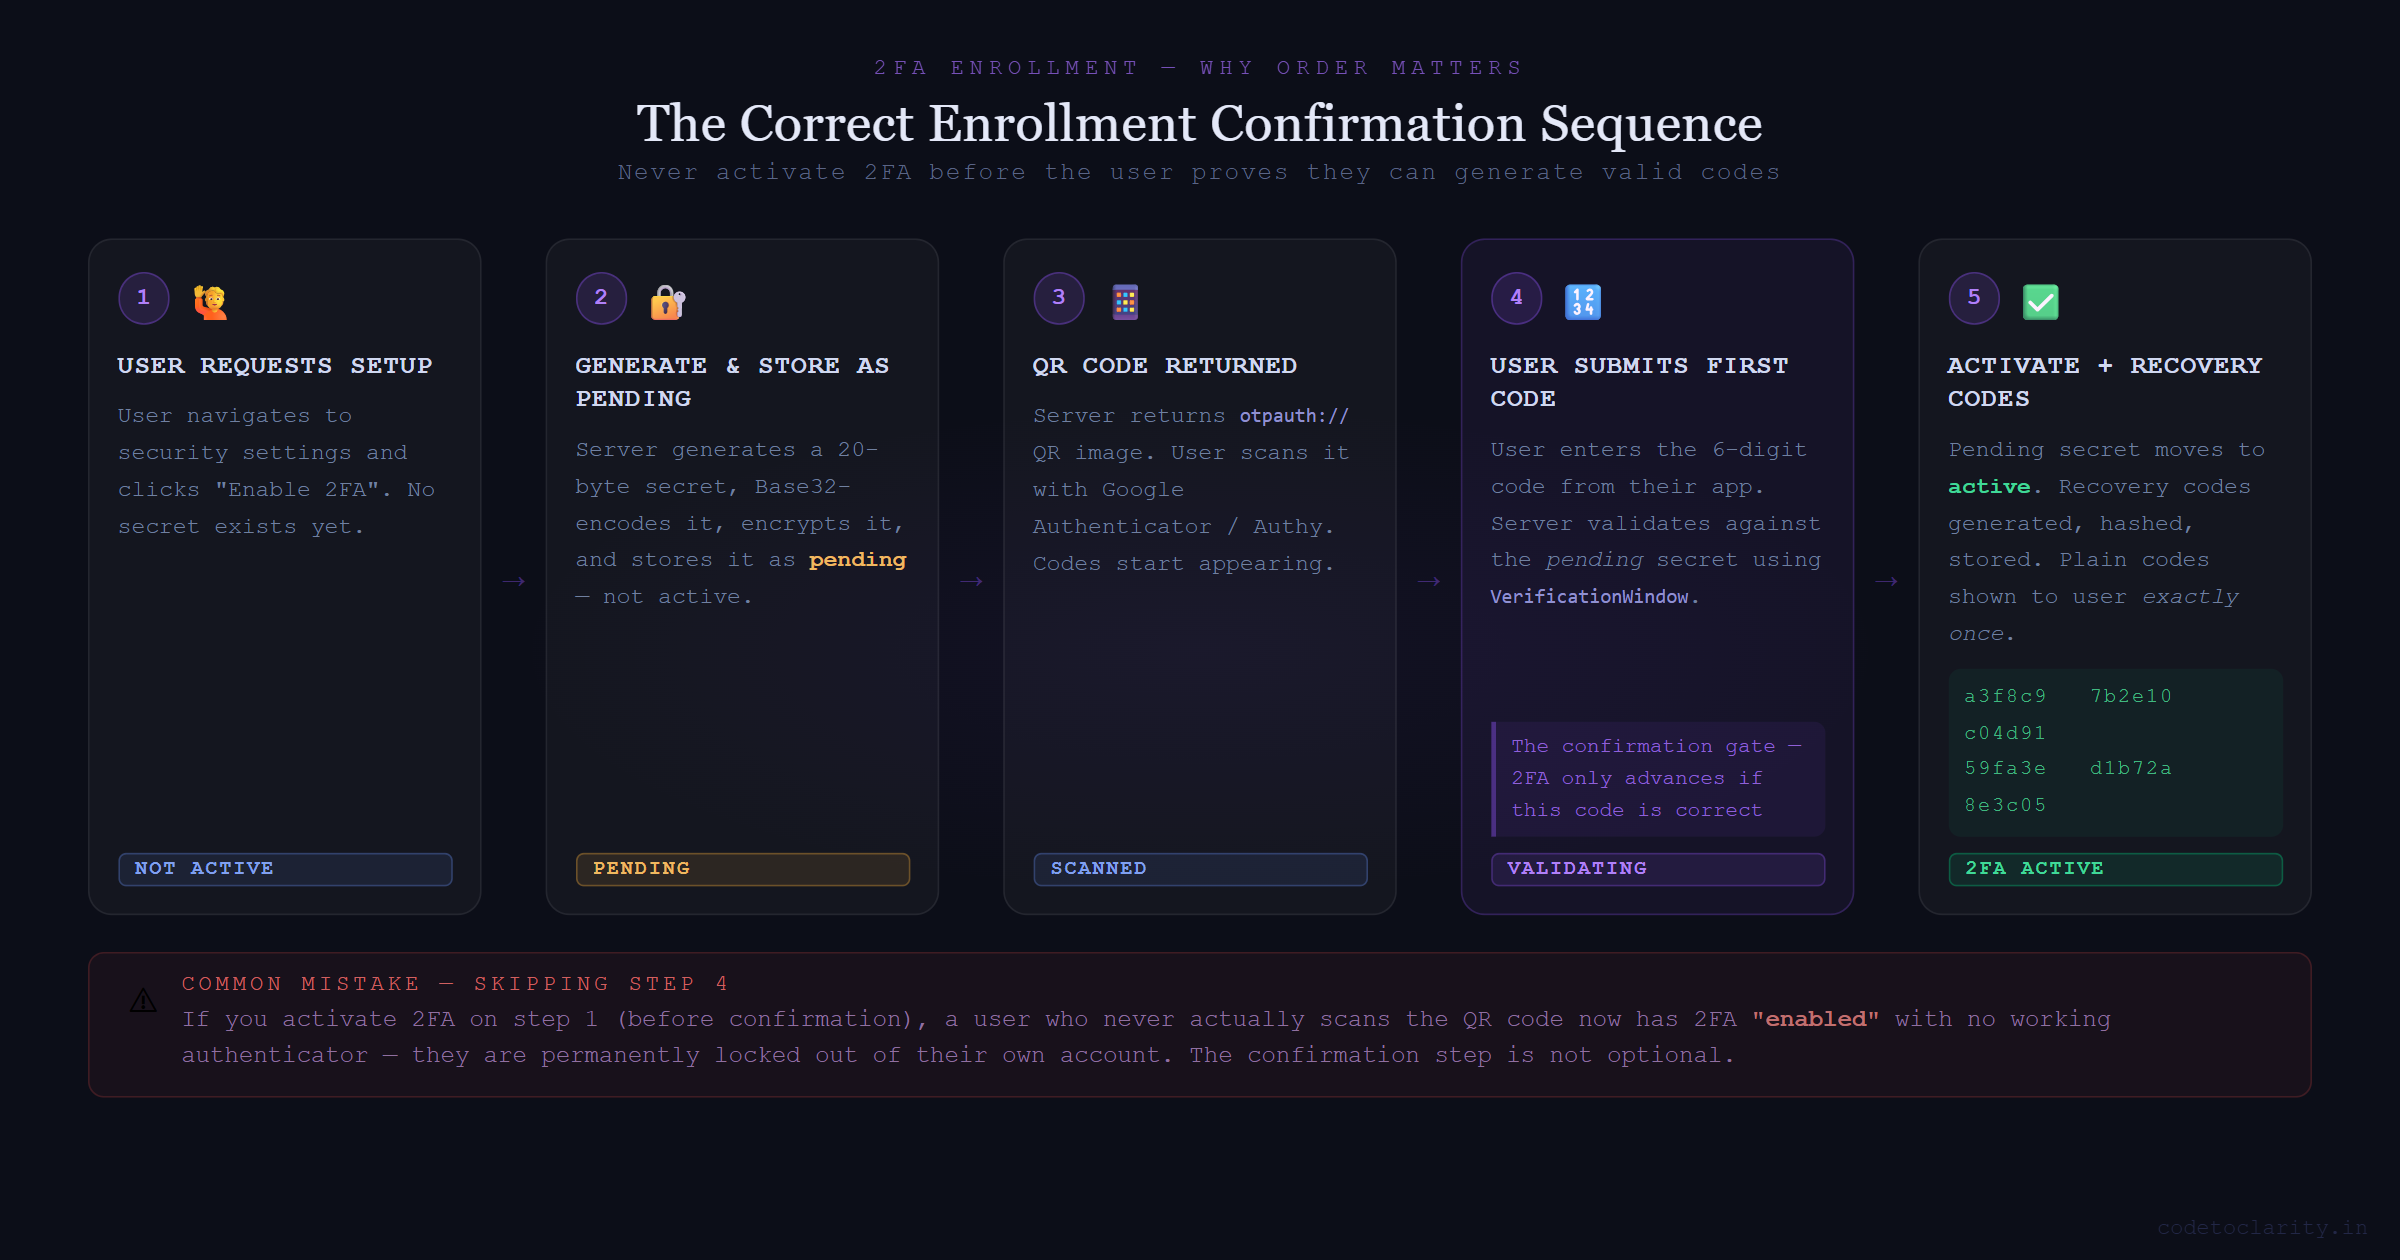
Here is a mistake that is easy to make: enabling 2FA the moment the user requests setup. If you do that and the user never actually scans the QR code, they now have 2FA "enabled" with no working authenticator. They are locked out of their own account.
The correct enrollment sequence has a confirmation step before anything gets activated:
- User requests 2FA setup. Generate the secret, store it as pending.
- Return the QR code. The user scans it with their authenticator app.
- User submits the first 6-digit code from their app.
- Server validates the code against the pending secret.
- Only on a successful validation, move the secret from pending to active and generate recovery codes.
The confirmation endpoint:
app.MapPost("/2fa/confirm", async (
    ConfirmRequest request,
    HttpContext context,
    IUserService userService) =>
{
    string userId = context.User.GetUserId();

    // Retrieve the pending secret
    string? pendingSecret = await userService.GetPendingSecret(userId);
    if (pendingSecret is null)
        return Results.BadRequest("No pending 2FA setup found.");

    byte[] secretBytes = Base32Encoding.ToBytes(pendingSecret);
    var totp = new Totp(secretBytes);

    bool isValid = totp.VerifyTotp(
        request.Code,
        out _,
        VerificationWindow.RfcSpecifiedNetworkDelay);

    if (!isValid)
        return Results.BadRequest("Invalid code. Please try again.");

    // Activate 2FA and generate recovery codes
    await userService.Activate2FA(userId, pendingSecret);
    var recoveryCodes = await userService.GenerateRecoveryCodes(userId);

    return Results.Ok(new { recoveryCodes });
})
.RequireAuthorization();

internal record ConfirmRequest(string Code);
The VerificationWindow.RfcSpecifiedNetworkDelay parameter is important. It allows the previous and next 30-second time windows to also be considered valid. This accounts for clock drift between the user's device and your server. Without any tolerance window, a user who submits their code half a second before the server crosses a 30-second boundary will get rejected even though their code was perfectly valid on their device.
The Login Flow: The Part Everyone Gets Wrong
Let us talk about a subtle but critical mistake in many 2FA implementations.
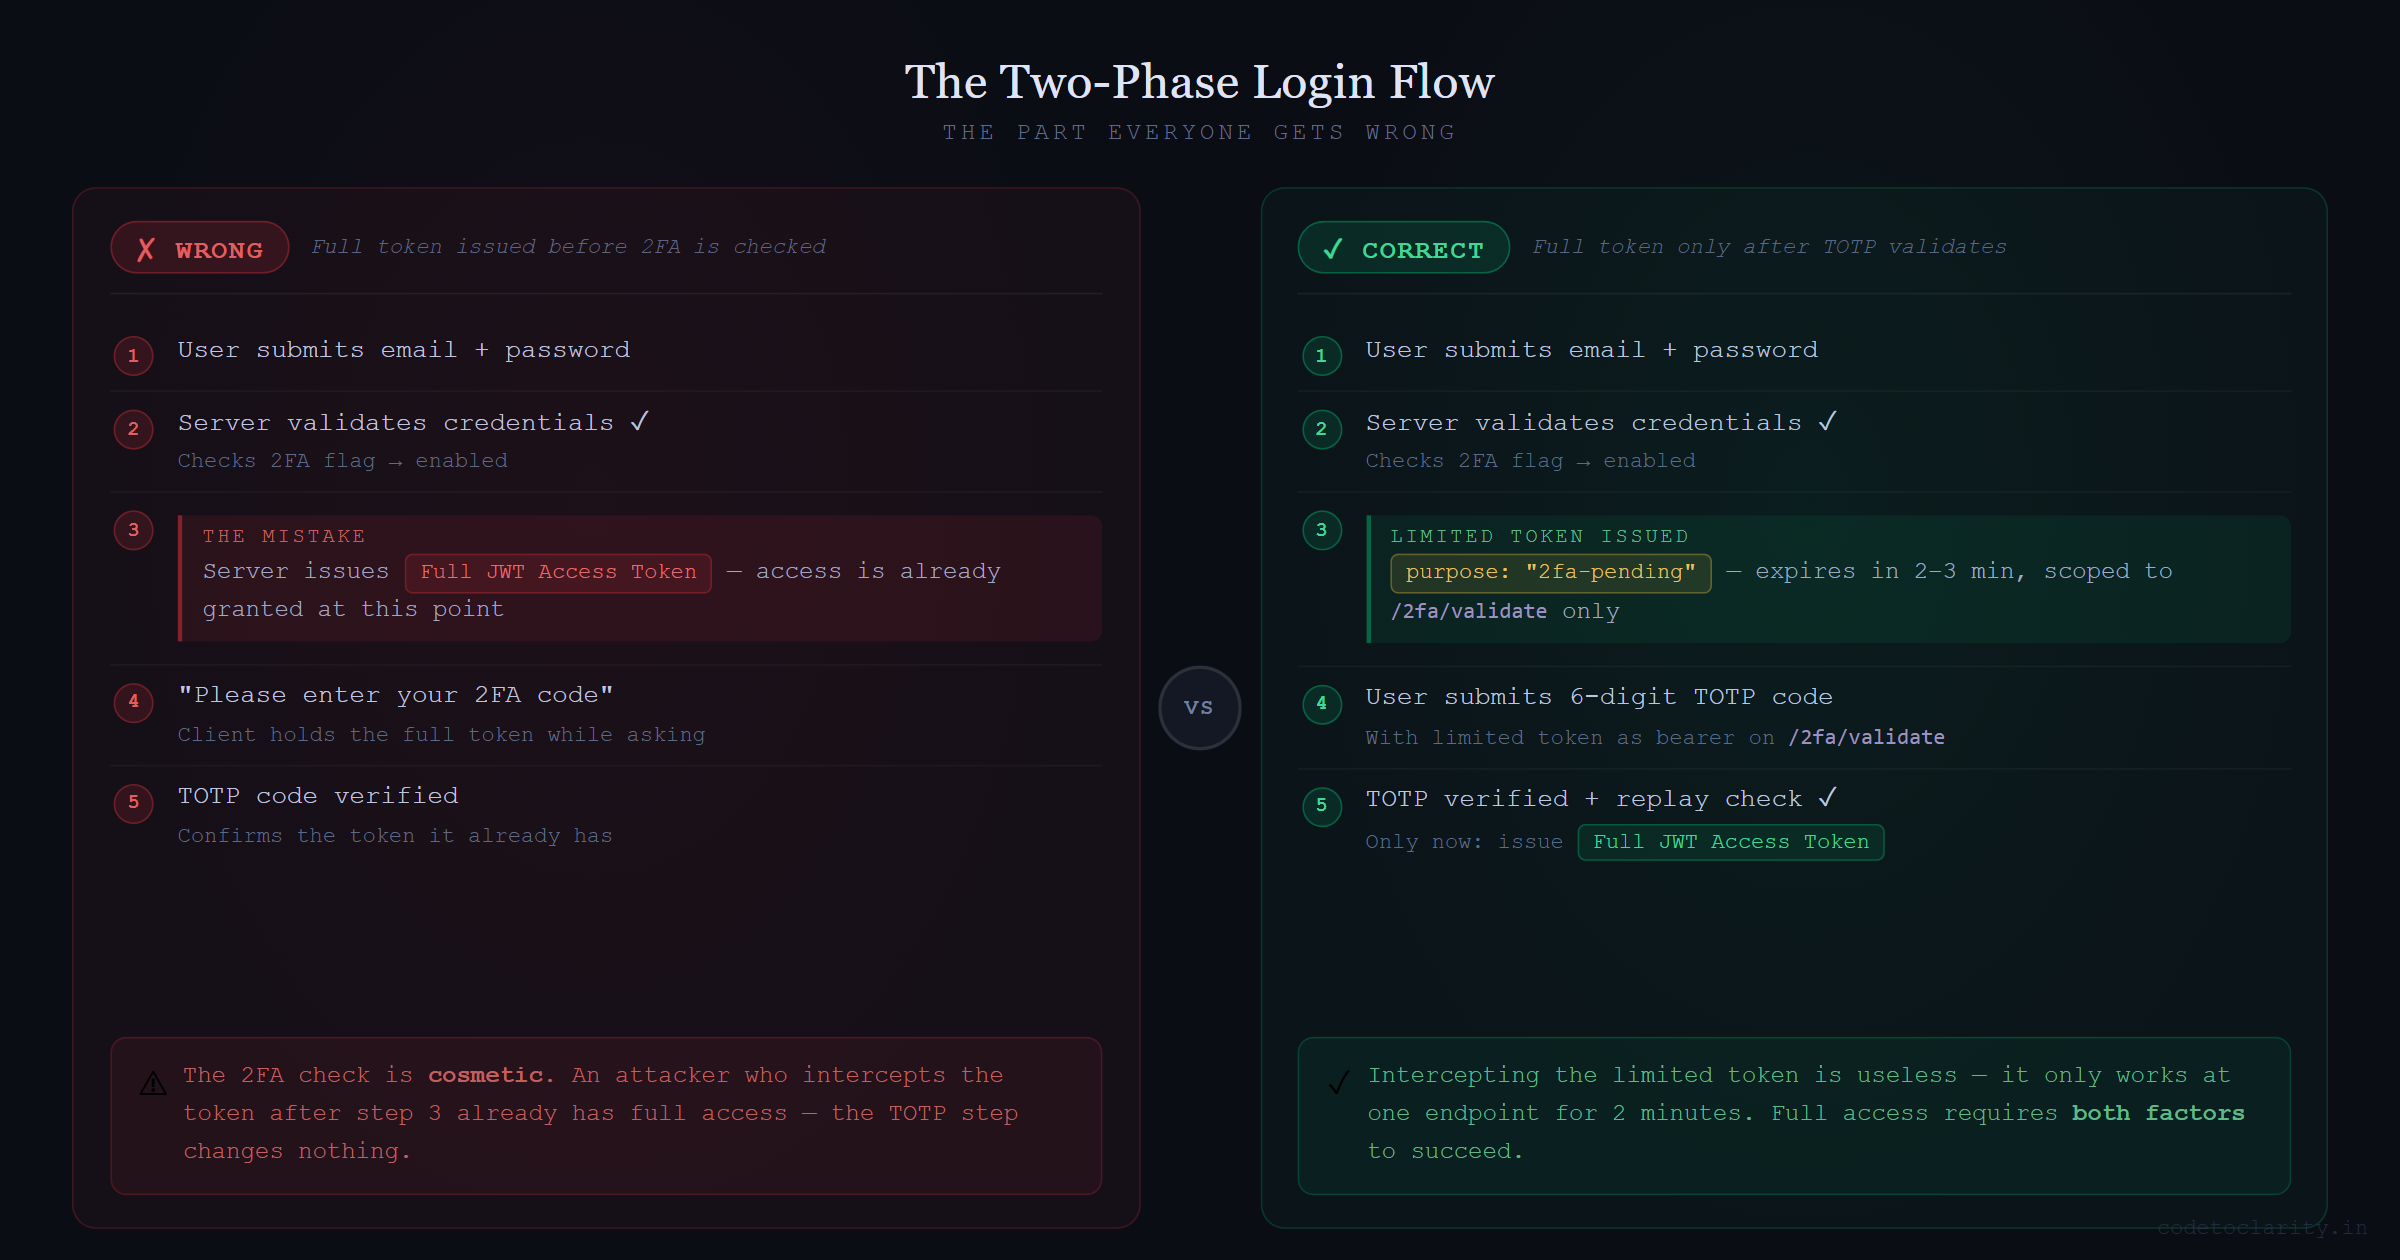
After a user enters their password correctly, you check if they have 2FA enabled. If they do, you should NOT issue a full access token at that point. If you issue a full JWT after the password check and then ask for the 2FA code as a "second step," you have already granted access. The 2FA step is cosmetic at that point.
The correct approach is a two-phase login:
Phase 1: User submits their credentials. If 2FA is enabled, issue a short-lived, limited-scope token that can only be used to call the 2FA validation endpoint.
Phase 2: User submits their TOTP code with that limited token. Only on success is the full access token issued.
app.MapPost("/auth/login", async (LoginRequest request, IUserService userService) =>
{
    var user = await userService.ValidateCredentials(request.Email, request.Password);
    if (user is null)
        return Results.Unauthorized();

    if (user.TwoFactorEnabled)
    {
        // Limited token: short expiry, restricted to 2fa/validate only
        string limitedToken = TokenService.GenerateLimitedToken(user.Id, purpose: "2fa-pending");
        return Results.Ok(new { requiresTwoFactor = true, token = limitedToken });
    }

    string accessToken = TokenService.GenerateAccessToken(user);
    return Results.Ok(new { accessToken });
});
The limited token should expire in two to three minutes and carry a specific claim (like purpose: "2fa-pending") that your authorization policy on the /2fa/validate endpoint verifies. This way, even if someone intercepts the limited token, it is useless anywhere except that one endpoint.
Validating Codes and Preventing Replay Attacks
The validation endpoint takes the TOTP code from the user and checks it against their stored secret:
app.MapPost("/2fa/validate", async (
    ValidateRequest request,
    HttpContext context,
    IUserService userService) =>
{
    string userId = context.User.GetUserId();

    string? secret = await userService.GetActiveSecret(userId);
    if (secret is null)
        return Results.BadRequest("2FA is not configured.");

    byte[] secretBytes = Base32Encoding.ToBytes(secret);
    var totp = new Totp(secretBytes);

    bool isValid = totp.VerifyTotp(
        request.Code,
        out long timeStepMatched,
        VerificationWindow.RfcSpecifiedNetworkDelay);

    if (!isValid)
        return Results.Unauthorized();

    // Replay attack prevention: reject codes from already-used time steps
    long? lastUsedStep = await userService.GetLastUsedTimeStep(userId);
    if (lastUsedStep.HasValue && timeStepMatched <= lastUsedStep.Value)
        return Results.BadRequest("This code has already been used.");

    await userService.UpdateLastUsedTimeStep(userId, timeStepMatched);

    string accessToken = TokenService.GenerateAccessToken(userId);
    return Results.Ok(new { accessToken });
})
.RequireAuthorization("2fa-pending");

internal record ValidateRequest(string Code);
The timeStepMatched output parameter tells you which 30-second window produced the valid match. Storing this and rejecting anything from the same or an earlier window closes a narrow but real replay attack window. Without it, an attacker who watches you type your code on a coffee shop screen could race to use it themselves within the same 30 seconds.
Rate Limiting the Validation Endpoint
A 6-digit TOTP code has exactly 1,000,000 possible values. That sounds like a lot until you realize an unprotected endpoint can be hammered at thousands of requests per second. Without rate limiting, a brute-force attack on the TOTP validation endpoint is completely feasible.
ASP.NET Core ships with a built-in rate limiting middleware since .NET 7. You can read the full rate limiting middleware docs on Microsoft Learn. A simple fixed-window policy per user is a strong starting point:
builder.Services.AddRateLimiter(options =>
{
    options.AddFixedWindowLimiter("totp-validation", policy =>
    {
        policy.Window = TimeSpan.FromMinutes(1);
        policy.PermitLimit = 5;
        policy.QueueLimit = 0;
    });
});
Apply this policy directly to your /2fa/validate endpoint. After five failed attempts within a minute, return 429 and consider temporarily locking the account.
Encrypting the Secret at Rest
The TOTP secret key is effectively a second password for the user. If your database gets exfiltrated and those secrets are stored in plain text, every account with 2FA enabled is compromised. The attacker can just generate valid codes for any user they like.
Encrypt the secret with AES-256 before writing it to the database and decrypt it only in memory when you need to verify a code. The encryption key itself must live in a secrets manager like Azure Key Vault, AWS KMS, or HashiCorp Vault. Never put it in appsettings.json.
public class CodeToClarityUserService : IUserService
{
    private readonly IEncryptionService _encryptionService;
    private readonly AppDbContext _db;

    public async Task StorePendingSecret(string userId, string plainSecret)
    {
        string encryptedSecret = _encryptionService.Encrypt(plainSecret);

        await _db.Users
            .Where(u => u.Id == userId)
            .ExecuteUpdateAsync(s =>
                s.SetProperty(u => u.PendingTwoFactorSecret, encryptedSecret));
    }

    public async Task<string?> GetActiveSecret(string userId)
    {
        var user = await _db.Users.FindAsync(userId);
        if (user?.TwoFactorSecret is null)
            return null;

        return _encryptionService.Decrypt(user.TwoFactorSecret);
    }
}
Recovery Codes: Your User's Safety Net
Users lose their phones. It happens constantly. If you do not provide a recovery mechanism, a lost phone means a permanently locked account, and that means a very unhappy support ticket.
Recovery codes are one-time-use backup codes generated when the user activates 2FA. Generate them with a cryptographically random source, hash them before storage (same principle as passwords), and show the plain-text versions exactly once.
public async Task<List<string>> GenerateRecoveryCodes(string userId, int count = 8)
{
    var plainCodes = new List<string>();

    for (int i = 0; i < count; i++)
    {
        // 10 random hex characters per code
        byte[] randomBytes = RandomNumberGenerator.GetBytes(5);
        plainCodes.Add(Convert.ToHexString(randomBytes).ToLower());
    }

    // Hash before storing — recovery codes are single-use passwords
    var hashedCodes = plainCodes
        .Select(c => BCrypt.Net.BCrypt.HashPassword(c))
        .ToList();

    // Clear existing codes and insert fresh ones
    await _db.RecoveryCodes
        .Where(rc => rc.UserId == userId)
        .ExecuteDeleteAsync();

    _db.RecoveryCodes.AddRange(hashedCodes.Select(h => new RecoveryCode
    {
        UserId = userId,
        CodeHash = h,
        IsUsed = false
    }));

    await _db.SaveChangesAsync();

    // Return plain codes to display to the user exactly once
    return plainCodes;
}
Validating a recovery code means checking each stored hash until one matches, then marking it as used:
public async Task<bool> UseRecoveryCode(string userId, string inputCode)
{
    var codes = await _db.RecoveryCodes
        .Where(rc => rc.UserId == userId && !rc.IsUsed)
        .ToListAsync();

    var match = codes.FirstOrDefault(rc =>
        BCrypt.Net.BCrypt.Verify(inputCode, rc.CodeHash));

    if (match is null) return false;

    match.IsUsed = true;
    await _db.SaveChangesAsync();

    return true;
}
Eight codes is a reasonable default. Tell users to store them somewhere safe, like a password manager. Let them regenerate the full set at any time if they run low.
Quick Security Checklist
Before shipping 2FA in your app, run through this list:
- Two-phase login: No full access token until after TOTP validation passes.
- Enrollment confirmation: 2FA is only activated after the user proves they can generate valid codes.
- Encrypted secrets at rest: AES-256 encryption with keys stored in a proper secrets manager.
- Replay prevention: Track the last used time step and reject reuse.
- Rate limiting: Enforce strict attempt limits on the validation endpoint.
- Recovery codes: Hashed, one-time-use, shown to the user once on setup.
- Short-lived limited tokens: The token issued after password check is scoped only to the 2FA endpoint.
Wrapping Up
TOTP-based 2FA is one of those features that is genuinely worth understanding from first principles. You are not just plugging in a library and calling it done. You are making decisions about when to activate 2FA, how to handle the login transition, how to protect secrets, and how to keep users from getting locked out permanently.
The implementation we built here covers all the pieces you need to ship this in a real application. If you want to skip the custom implementation entirely, ASP.NET Core Identity does support TOTP out of the box. But rolling it yourself is a worthwhile exercise, especially when you need custom flows or tighter control over how secrets and tokens are managed.
Build the confirmation step, encrypt those secrets, add the rate limiter, and give your users recovery codes. Get all of those right and you will have added one of the most effective security layers possible to your application.

Kishan Kumar
Software Engineer / Tech Blogger
A passionate software engineer with experience in building scalable web applications and sharing knowledge through technical writing. Dedicated to continuous learning and community contribution.