Automating .NET 9 Deployments with GitHub Actions and OIDC
Learn how to build a robust, passwordless CI/CD pipeline for your .NET 9 applications using GitHub Actions, OIDC authentication, and Azure App Service.
Have you ever built a fantastic .NET application, tested it exhaustively on your local machine, feeling incredibly proud of your work, only to completely mess up the deployment when trying to move it to the production server? If you have, you are absolutely not alone. The old school process of right clicking on your project in Visual Studio, generating a zip file, and manually uploading it to a server is a recipe for disaster. One missed file, a forgotten configuration setting, or simply uploading to the wrong directory can easily take down your entire application in production.
This manual process is slow, nerve wracking, and incredibly prone to human error. But what if your server could simply watch your code repository and automatically build and deploy new changes the exact second you push them? That is the magic of Continuous Integration and Continuous Deployment. In this guide, we are going to explore how to set up a robust, modern, and highly secure CI/CD pipeline for a .NET 9 application targeting Azure App Service using GitHub Actions.
Understanding the Magic of CI/CD
Before we touch a single line of YAML code or configure any cloud infrastructure, let us clearly define what we are actually trying to achieve here. CI/CD stands for Continuous Integration and Continuous Deployment. While it sometimes sounds like complex corporate jargon reserved for massive enterprise teams, the concept is beautifully simple and incredibly relevant even for solo developers.
Continuous Integration is the practice of automatically verifying that your application still works every time a developer makes a change. When you push your code to a repository branch, an automated system immediately downloads that exact code, restores the necessary NuGet packages, builds the application, and runs your automated test suite. If any step fails, the system blocks the code from moving forward. This ensures your repository is always in a healthy, buildable state, preventing the classic "it works on my machine" problem.
Continuous Deployment takes over right after Continuous Integration finishes successfully. Once the code is verified, the Continuous Deployment process automatically packages your application, manages environment variables, and ships the finalized binaries directly to your hosting environment. In our specific case, that environment is an Azure App Service.
Put simply, a properly structured CI/CD pipeline changes your workflow from a stressful manual chore into a seamless automated background task. You push code to GitHub. A few minutes later, your live website is updated. You can sit back, take a sip of coffee, and watch the cloud computing machines do the heavy lifting for you.
Why Choose GitHub Actions for .NET 9?
The .NET ecosystem has seen incredible performance and productivity improvements with the release of .NET 9. Applications handle requests faster, consume significantly less memory, and provide an excellent developer experience. When choosing a platform to automate deployments for these modern, highly optimized applications, GitHub Actions stands out as the premier choice for a few key reasons.
First, GitHub Actions is built directly into the very platform where your source code already lives. There is no need to set up external build servers like Jenkins, manage separate authentication systems, or pay for third party continuous integration tools. You just create a configuration file in your repository, and GitHub provisions fresh virtual machines in the cloud to run your commands on demand.
Second, the integration between GitHub Actions and Microsoft Azure is simply phenomenal. Because Microsoft owns both platforms, they have invested heavily in creating official, highly optimized actions that make authenticating and deploying to Azure incredibly seamless. Instead of writing complex bash scripts to talk to server endpoints, you can rely on robust, prebuilt components maintained directly by the Microsoft engineering team.
The Trap of the Publish Profile
If you have ever followed older deployment tutorials for deploying to Azure App Service, you might be familiar with the classic "Publish Profile" method. In that approach, you go into the Azure Portal, click a button to download a special XML file containing your deployment credentials, and then save those credentials directly as a secret in your GitHub repository.
While the publish profile method technically works and gets the job done, it is universally considered outdated and severely insecure by modern cloud engineering standards. A publish profile is essentially a permanent, long lived password to your server. It never expires unless you manually revoke it. If that secret is ever leaked, accidentally exposed in a log file, or otherwise compromised, a malicious actor instantly gains unrestricted access to overwrite your application files at any time.

The Modern Way: Passwordless Security with OIDC
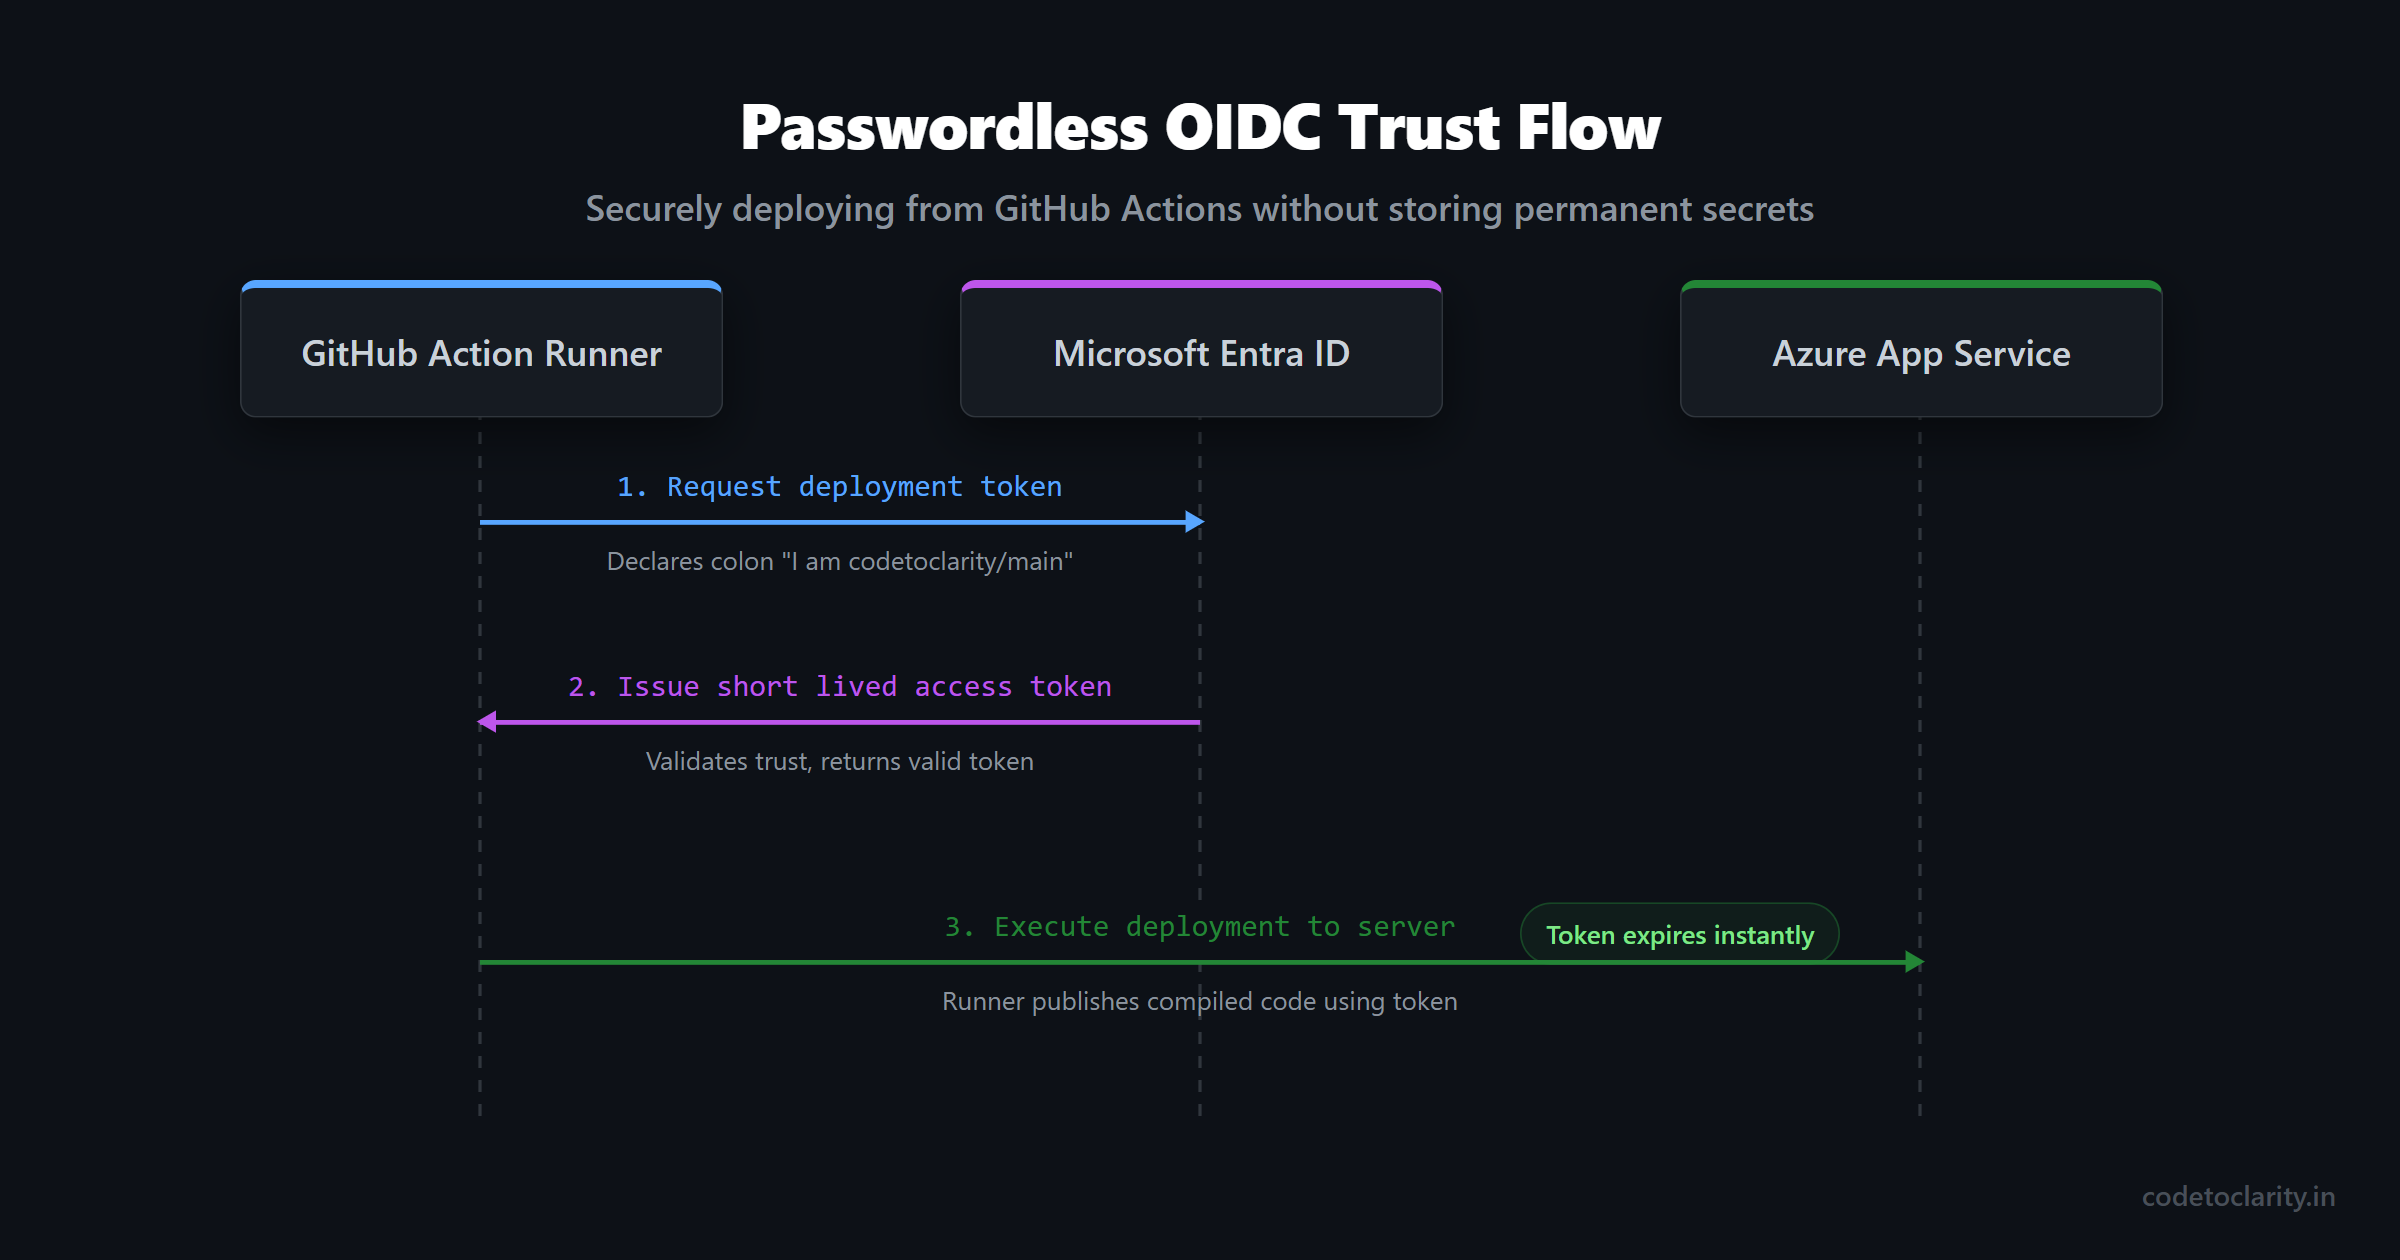
Instead of using a long lived, static password, modern infrastructure relies on a security concept called OpenID Connect, commonly abbreviated as OIDC. Using OIDC, you can configure your Azure App Service to explicitly trust your specific GitHub repository without ever generating a traditional password or secret key.
When your GitHub Action workflow runs, it reaches out to Azure and essentially says, "Hello, I am the codetoclarity repository attempting to run a deployment originating from the main branch." Because Azure has been configured to trust that exactly combination of repository and branch, it dynamically generates a temporary, short lived access token. The GitHub workflow uses this temporary token to authorize the code deployment, and then the token immediately expires.
There are zero passwords to rotate, no risky publish profiles to download, and absolutely no permanent secrets stored anywhere in your source control pipeline. If this sounds like a massive security upgrade, that is because it absolutely is. It is the enterprise standard, and you can implement it for your personal projects for free. Let us walk through exactly how to set this up step by step.
Step 1: Preparing Your Azure App Service
Before we can write our deployment pipeline, we need a place for our application to actually live on the internet. Navigate to the Azure Portal and search for App Services. Create a new Web App resource. When configuring the resource details, make absolutely sure to select .NET 9 as your runtime stack.
You will have the choice between choosing either a Linux or Windows environment for your operating system. For modern .NET development, Linux is highly recommended because it generally provides better performance, utilizes faster startup times, and incurs significantly lower hosting costs. The days of needing Windows servers to host .NET code are long gone!
Once your Azure App Service is officially created and running, take note of the exact application name, as we will explicitly need it for our deployment script later.
Step 2: Configuring OIDC Trust in Microsoft Entra ID
Now we need to completely establish the trust relationship between your Azure environment and your GitHub repository. We accomplish this using Microsoft Entra ID (formerly known as Azure Active Directory), which officially handles identity and access management for everything running on Azure infrastructure.
First, search for "Microsoft Entra ID" in the top Azure portal search bar. On the left hand navigation menu, select "App registrations" and click the button to create a brand new app registration. You can name this registration something highly descriptive, like "codetoclarity-github-deployer".
Once the application is successfully registered, navigate to its "Certificates & secrets" page using the left hand menu. Click right on the "Federated credentials" tab and select the option to "Add credential". You will be presented with a dropdown list of scenarios. Choose the scenario specifically labeled for "GitHub Actions deploying Azure resources".
Azure will explicitly ask for your exact GitHub organization name (or your personal username), your exact repository name, and the branch name that should be allowed to run deployments, which is usually the main branch. Fill in these details exactly as they appear on your GitHub page. This specific configuration is crucial because it physically prevents any other unauthorized repository from attempting to request a token on your behalf.
Step 3: Granting Deployment Permissions
Your new Entra ID application now officially trusts GitHub, but we still need to give that application permission to actually deploy code and modify your newly created App Service.
Navigate back to the specific resource group that contains your App Service. Click on "Access control (IAM)" in the sidebar navigation, and then click the button for "Add role assignment". You will want to choose the "Contributor" role, or the slightly more restrictive "Website Contributor" role. When the portal asks you who to assign this role to, simply select the exact App Registration name you created in the very previous step.
Step 4: Creating GitHub Secrets
Our final configuration step before writing the pipeline is telling GitHub the identity keys of the required Azure resources so it knows exactly who to talk to when requesting a deployment token.
Go all the way back to your Entra ID App Registration overview page in Azure. You will see several identification numbers listed prominently there. You need to carefully copy three specific values. First, the Application (client) ID. Second, the Directory (tenant) ID. Finally, you explicitly need your Azure subscription ID, which can be easily found on your main resource group overview page.
Head over to your GitHub repository on the web. Go to Settings, then click on Secrets and variables, and finally choose Actions. You need to meticulously add three new repository secrets using the exact values you just copied:
AZURE_CLIENT_IDAZURE_TENANT_IDAZURE_SUBSCRIPTION_ID
With these three identification variables saved securely, our authentication foundation is completely finished. It might seem like a lot of steps compared to simply downloading a publish profile, but the massive security benefits of this passwordless architecture are absolutely worth the upfront configuration effort.
Step 5: Writing the GitHub Deployment Workflow
Now comes the truly exciting part. We are finally going to write the YAML instruction file that tells GitHub exactly how to build and deploy our .NET 9 application.
In your local code repository, create a new file located precisely at the path .github/workflows/deploy.yml. GitHub automatically looks inside this hidden folder setup to discover workflow definitions.
We will start our script by defining the name and the trigger. We want this workflow to run completely automatically every time fresh code is pushed explicitly to the main branch.
name: Deploy .NET 9 to Azure App Service

on:
  push:
    branches:
      - main
Next, we define our single deployment job. Crucially, we must actively grant the id-token permission. Without this highly explicit permission, GitHub is completely forbidden from requesting the OIDC token from Azure, and our fancy passwordless authentication will immediately fail.
jobs:
build-and-deploy:
runs-on: ubuntu-latest
permissions:
id-token: write
contents: read
steps:
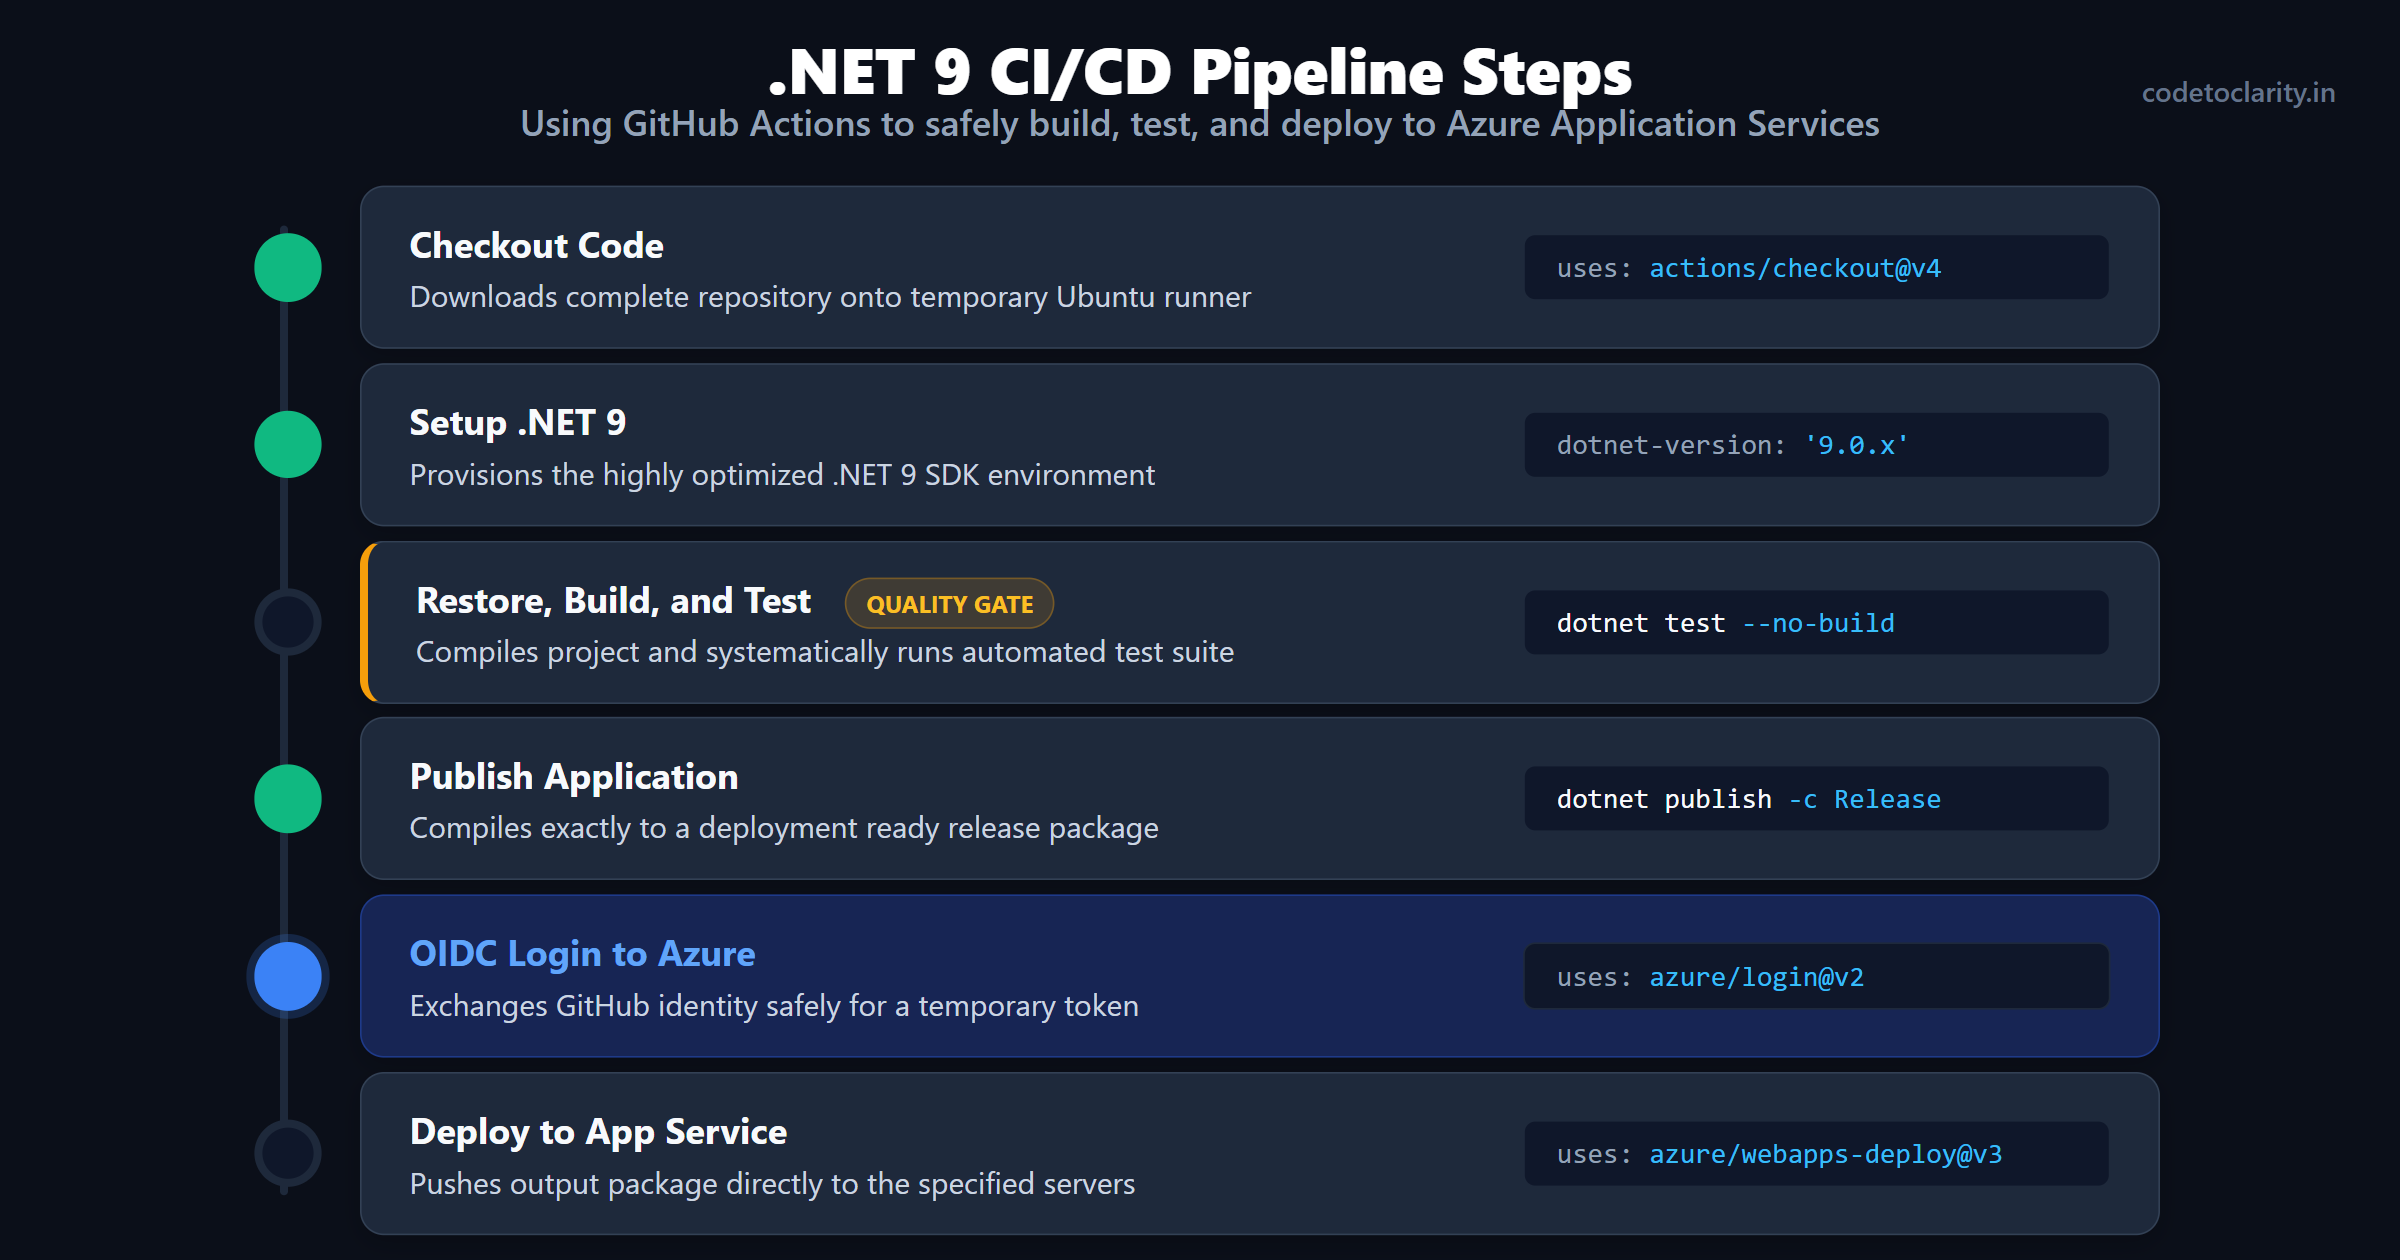
- name: Checkout Code
uses: actions/checkout@v4
The very first step simply utilizes the official checkout action to download a complete copy of our repository onto the temporary Ubuntu runner machine.
Step 6: Building and Testing the .NET 9 Application
Now we need to properly install the correct .NET 9 SDK version onto the runner machine and systematically compile our application.
      - name: Setup .NET 9
        uses: actions/setup-dotnet@v4
        with:
          dotnet-version: '9.0.x'

      - name: Restore, Build, and Test
        run: |
          dotnet restore
          dotnet build --configuration Release --no-restore
          dotnet test --no-build --verbosity normal
This specific section is incredibly vital. We are explicitly running dotnet test right before we ever attempt to finalize the deployment. If any automated unit tests happen to fail, the workflow immediately crashes, turns red, and stops running. This automated quality gate is the primary reason CI/CD pipelines are so incredibly valuable for software engineering teams. It physically blocks you from unknowingly deploying totally broken code directly to your production servers!
If the tests pass successfully with flying colors, we instruct the .NET CLI environment to compile our application into a deployment-ready, highly optimized package. We will output all the finalized configuration files and binaries directly into a specific folder named publish_output.
      - name: Publish Application
        run: dotnet publish -c Release -o ./publish_output
Step 7: Authenticating and Deploying to Azure
With our application officially compiled, tested without errors, and ready to go, we pull the metaphorical trigger. We use the official Azure Login action, passing in the non-secret identifiers we securely saved earlier in GitHub. Because of the very specific trust system we successfully configured in Entra ID, Azure grants the pipeline runner a temporary administrative deployment token.
      - name: OIDC Login to Azure
        uses: azure/login@v2
        with:
          client-id: ${{ secrets.AZURE_CLIENT_ID }}
          tenant-id: ${{ secrets.AZURE_TENANT_ID }}
          subscription-id: ${{ secrets.AZURE_SUBSCRIPTION_ID }}
Finally, we simply use the official WebApps Deploy action to push the exact contents of our publish_output directory directly to the internet server. Be sure to carefully replace codetoclarity-app-name with the actual name of your Azure App Service.
      - name: Deploy to Azure App Service
        uses: azure/webapps-deploy@v3
        with:
          app-name: 'codetoclarity-app-name'
          package: './publish_output'

      - name: Clean up Azure Session
        run: az logout
The az logout cleanup command at the very end explicitly ensures the temporary session is permanently destroyed, leaving absolutely zero traces or access tokens awkwardly lingering on the public runner machine.
Save this completed YAML file, commit the local changes, and firmly push them up to GitHub. Navigate immediately to the "Actions" tab in your repository console, and you will see your pipeline automatically spring beautifully to life. After a few short minutes, your newest code will be fully live on the internet!
Common Beginner Pitfalls and How to Avoid Them
When implementing automated CI/CD for the very first time, you are almost guaranteed to run into a few frustrating road bumps. Here are the most exceedingly common mistakes beginners habitually make and how you can easily avoid them.
Deploying the Wrong Folder Structure
One of the most frequent setup errors occurs when tired developers accidentally point the deployment file action completely at the root of their code repository instead of the dedicated output folder. The Azure App Service deployment engine specifically expects the provided zip package to contain the raw application binary files directly at its root level.
If you accidentally zip up your entire repository structure, including your solution files and source code folders, the server will not understand how to execute your application, resulting in an immediate and frustrating server crash. Always explicitly point your deployment step right to the clean output directory specifically generated by the dotnet publish command.
Missing Application Settings
It is extremely common to successfully have an appsettings.json file on your local machine that heavily contains vital connection strings or sensitive API keys. Because committing such secrets to an open code repository is a massive, dangerous security risk, professional developers correctly ignore these files or leave the keys totally blank in source control history.
However, if you forget to manually add those critical configuration keys straight into the Azure App Service environment variable settings panel, your newly deployed application will predictably crash entirely on startup complaining loudly about surprisingly missing connection strings. Always remember to duplicate your local secrets securely directly into the Azure App Service configuration panel within the Azure portal environment, or actively look into using a dedicated secret management tool for more impressively robust architectural setups.
Assuming "Zip Deploy Successful" Means Zero Errors
When your GitHub Action deployment fully finishes and displays a beautiful green checkmark, it only strictly means the files were successfully transferred directly to the Azure server. It absolutely does not magically guarantee that your application is actually working or running healthily without runtime logic crashes.
After every single new pipeline setup, firmly remember to always visit your live application URL to meticulously verify it actually responds correctly. If it unfortunately returns a generic 500 Internal Server error, check the Azure App Service Log Stream diagnostic tools. The log stream tool will easily display the exact programmatic exception being aggressively thrown by your newly deployed .NET 9 application during startup sequence, easily allowing you to rapidly diagnose frustratingly missing dependency or setup configuration issues.
Deploying with Complete Confidence
By moving completely away from manual publish profiles and fully embracing completely automated GitHub Actions cleverly equipped with perfectly secure OIDC authentication, you dramatically mature your entire software development lifecycle process. You instantly gain the calm confidence of knowing absolutely every single release is properly tested thoroughly and identically built repeatedly.
More importantly, you completely eliminate the lingering anxiety out of shipping critical software updates. Your raw code automatically moves straight from a simple commit history into a highly reliable, continuously delivered product ecosystem, leaving you impressively with significantly more time to completely focus on actually building genuinely great application features instead of repeatedly debugging oddly broken server deployment environments.

Kishan Kumar
Software Engineer / Tech Blogger
A passionate software engineer with experience in building scalable web applications and sharing knowledge through technical writing. Dedicated to continuous learning and community contribution.