
Rate Limiting in ASP.NET Core: A Beginner-Friendly Guide to All 4 Algorithms
Learn how to implement rate limiting in ASP.NET Core using the built-in middleware. Covers all 4 algorithms (fixed window, sliding window, token bucket, concurrency) with practical code examples.
Imagine you just launched a public API for your app. Things look great, traffic is picking up, and users are happy. Then one morning you wake up to alerts: the server is crawling, your database is being hammered, and legitimate users are getting timeouts.
What happened? A single bad actor wrote a loop that fires 10,000 requests per minute at your endpoint. Or maybe it wasn't even malicious. A developer on someone else's team had a retry bug in their client code and accidentally sent your server into a spiral.
This is exactly what rate limiting exists to prevent.
Rate limiting is the practice of controlling how many requests a client can make to your API within a given time window. It's not just a performance concern. It's a security concern, a cost concern, and a fairness concern. Without it, your system is essentially wide open to abuse, whether intentional or not.
The good news is that ASP.NET Core has had built-in rate limiting middleware since .NET 7, and it keeps getting better. In this guide we'll walk through what rate limiting actually does, the four built-in algorithms you can use, how to wire them up in your app, and which one to reach for in different situations.
What Does Rate Limiting Actually Protect You From?
Before jumping into code, it's worth understanding what you're defending against. Rate limiting addresses a few distinct problems:
Server overload. Every request consumes CPU cycles, memory, and database connections. Unconstrained traffic, even from well-behaved clients, can saturate your resources. Rate limiting acts as a pressure valve.
API abuse and DDoS mitigation. While a full distributed denial-of-service attack requires additional infrastructure-level defenses, rate limiting stops simpler abuse patterns. A bot can't scrape your user data at full speed if you cap it at 20 requests per minute per IP. As Microsoft's documentation notes, rate limiting helps protect apps from abuse, ensures fair usage across clients, and guards backend resources from overload.
Cost control. In cloud environments, your bill is often tied to compute usage. A spike in requests driven by a misbehaving client can translate directly to an unexpected invoice.
Fair multi-tenancy. In SaaS applications, one tenant hogging all the request capacity degrades the experience for everyone else. Per-user or per-tenant rate limits keep the playing field level.
Setting Up Rate Limiting in ASP.NET Core
The rate limiting middleware lives in the Microsoft.AspNetCore.RateLimiting namespace and has been part of the framework since .NET 7, so no separate NuGet package is required in modern versions.
The setup is two steps: register the services, then add the middleware to the pipeline.
// Program.cs

builder.Services.AddRateLimiter(options =>
{
    options.RejectionStatusCode = StatusCodes.Status429TooManyRequests;
    // rate limiter policies go here
});

// ...

app.UseRateLimiter();
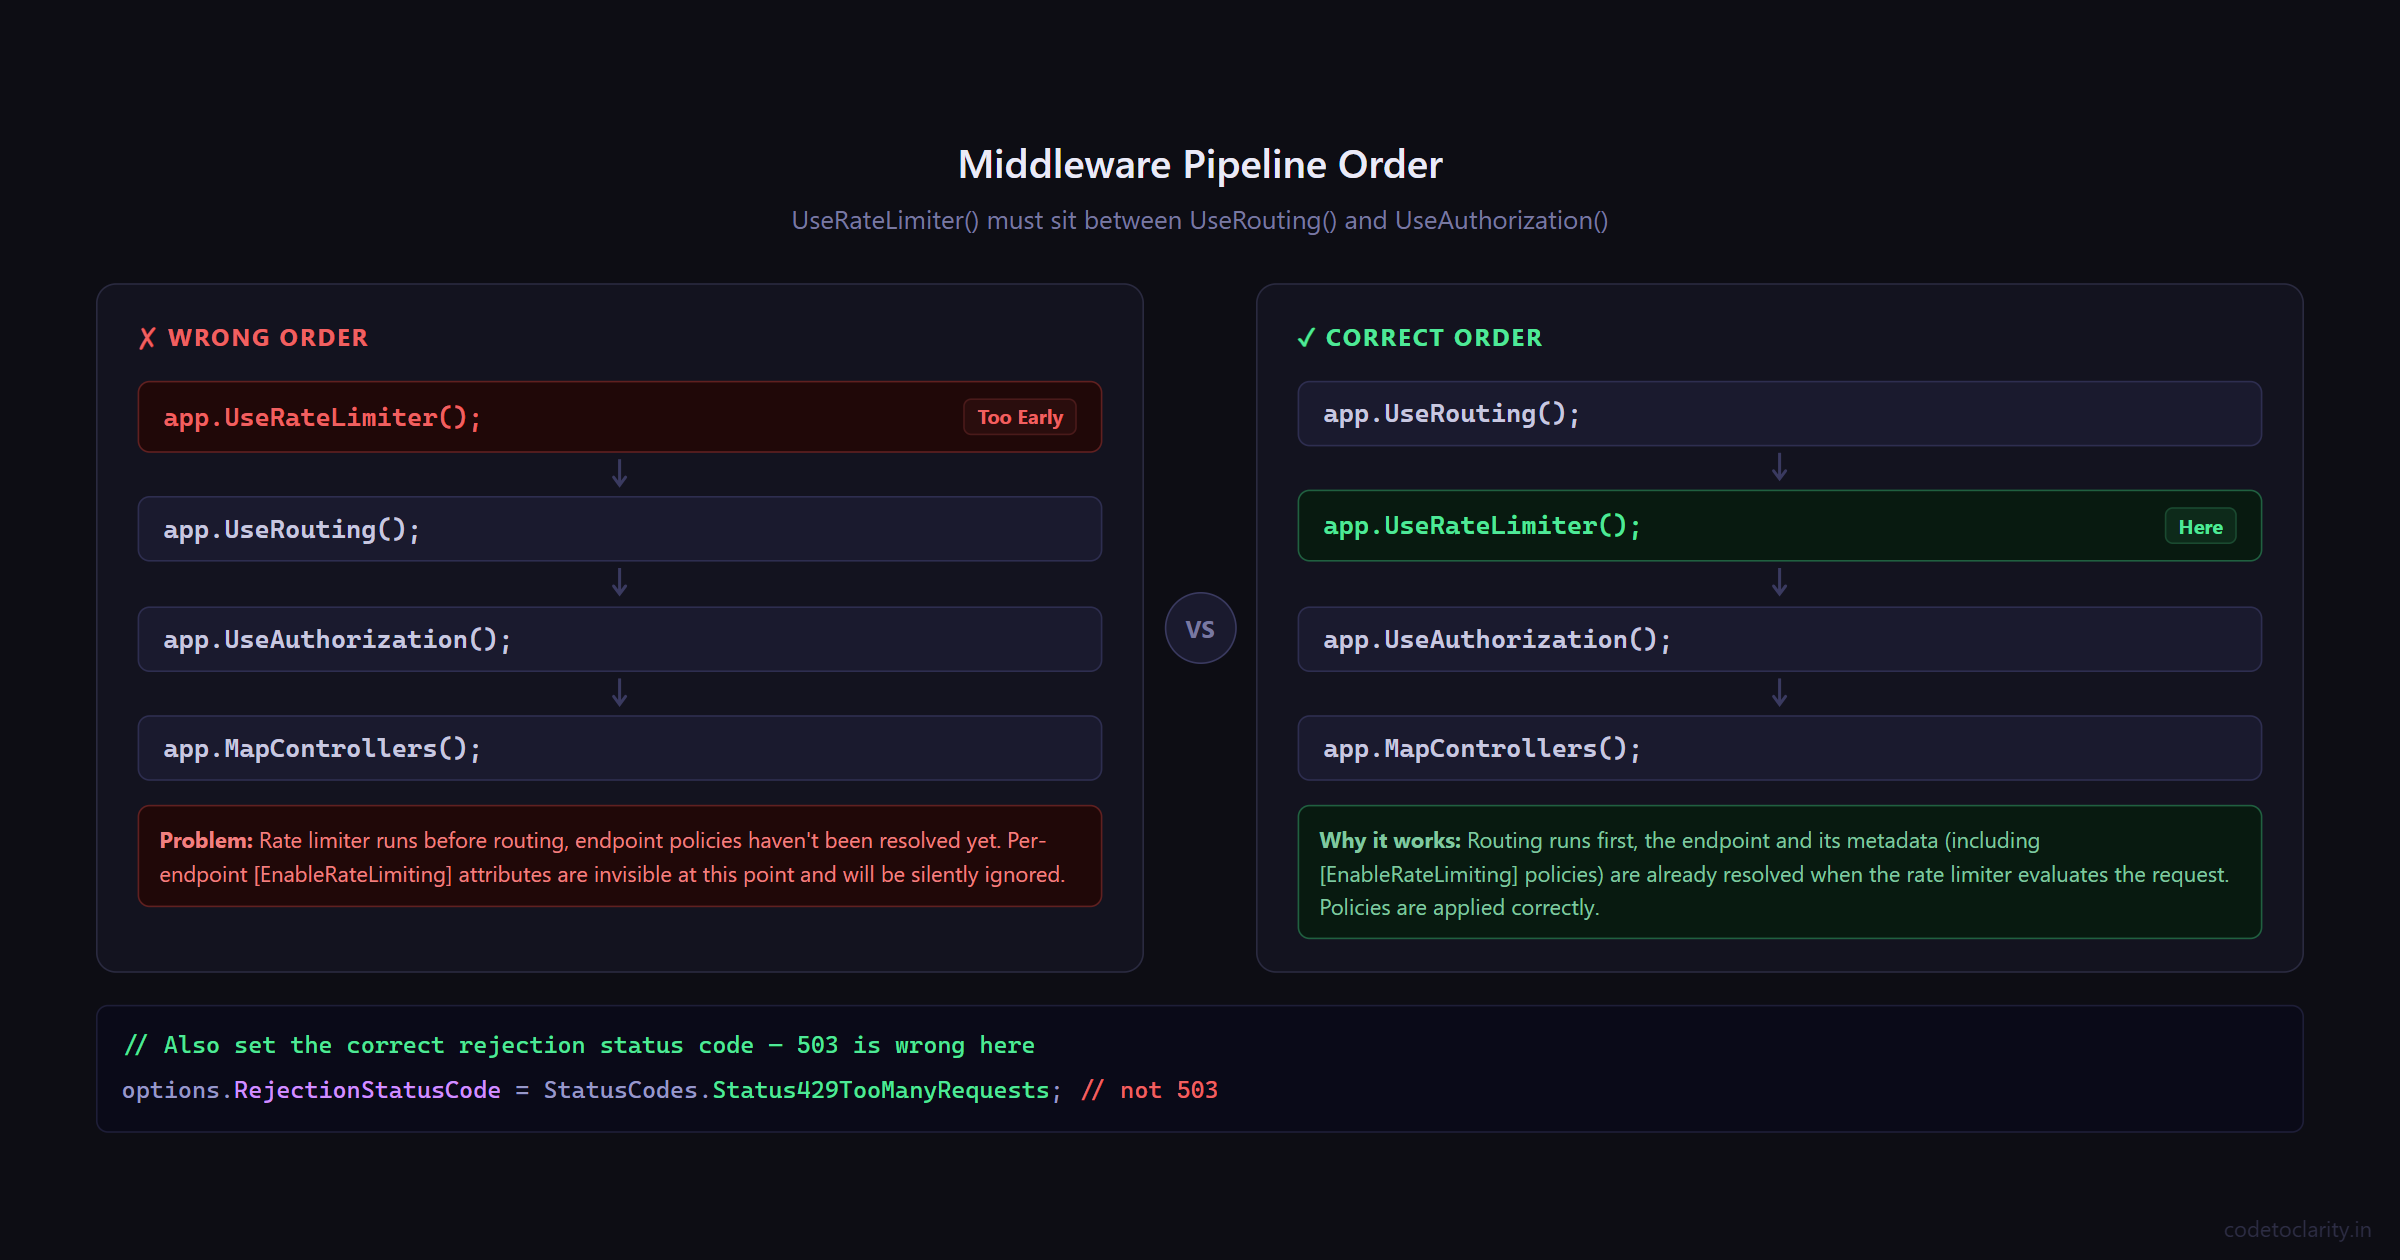
One thing worth noting: the default rejection status code is 503 Service Unavailable, but that's semantically wrong. A 503 signals that the server is down or temporarily unavailable, which isn't what's happening. Instead, you're actively rejecting a client that exceeded their quota. The correct status code is 429 Too Many Requests, and it's worth setting explicitly.
Also pay attention to where UseRateLimiter() sits in your middleware pipeline. It should come after UseRouting() but before UseAuthorization() and your endpoint mappings. The order matters.
app.UseRouting();
app.UseRateLimiter(); // Here, not before UseRouting
app.UseAuthorization();
app.MapControllers();
Now let's look at the four algorithms you can configure.
The Four Rate Limiting Algorithms: Which One Do You Need?
Choosing between rate limiting algorithms isn't just a technical decision; it shapes how your API behaves under pressure. Each algorithm makes different tradeoffs between simplicity, fairness, and burst tolerance. Let's go through each one with practical context.

1. Fixed Window Limiter
The fixed window algorithm is the most straightforward approach. You define a time window (say, 10 seconds), set a maximum number of allowed requests within that window, and once the limit is hit, further requests get rejected until the window resets.
Think of it like a parking lot with 10 spaces that gets completely emptied every 10 minutes regardless of how many cars came and went.
builder.Services.AddRateLimiter(options =>
{
    options.RejectionStatusCode = StatusCodes.Status429TooManyRequests;

    options.AddFixedWindowLimiter("codetoclarity-fixed", limiterOptions =>
    {
        limiterOptions.PermitLimit = 10;
        limiterOptions.Window = TimeSpan.FromSeconds(10);
        limiterOptions.QueueProcessingOrder = QueueProcessingOrder.OldestFirst;
        limiterOptions.QueueLimit = 3;
    });
});
Here, a maximum of 10 requests are allowed per 10-second window. The QueueLimit tells the middleware to hold up to 3 excess requests in a queue rather than rejecting them outright, and they'll be processed when capacity opens up.
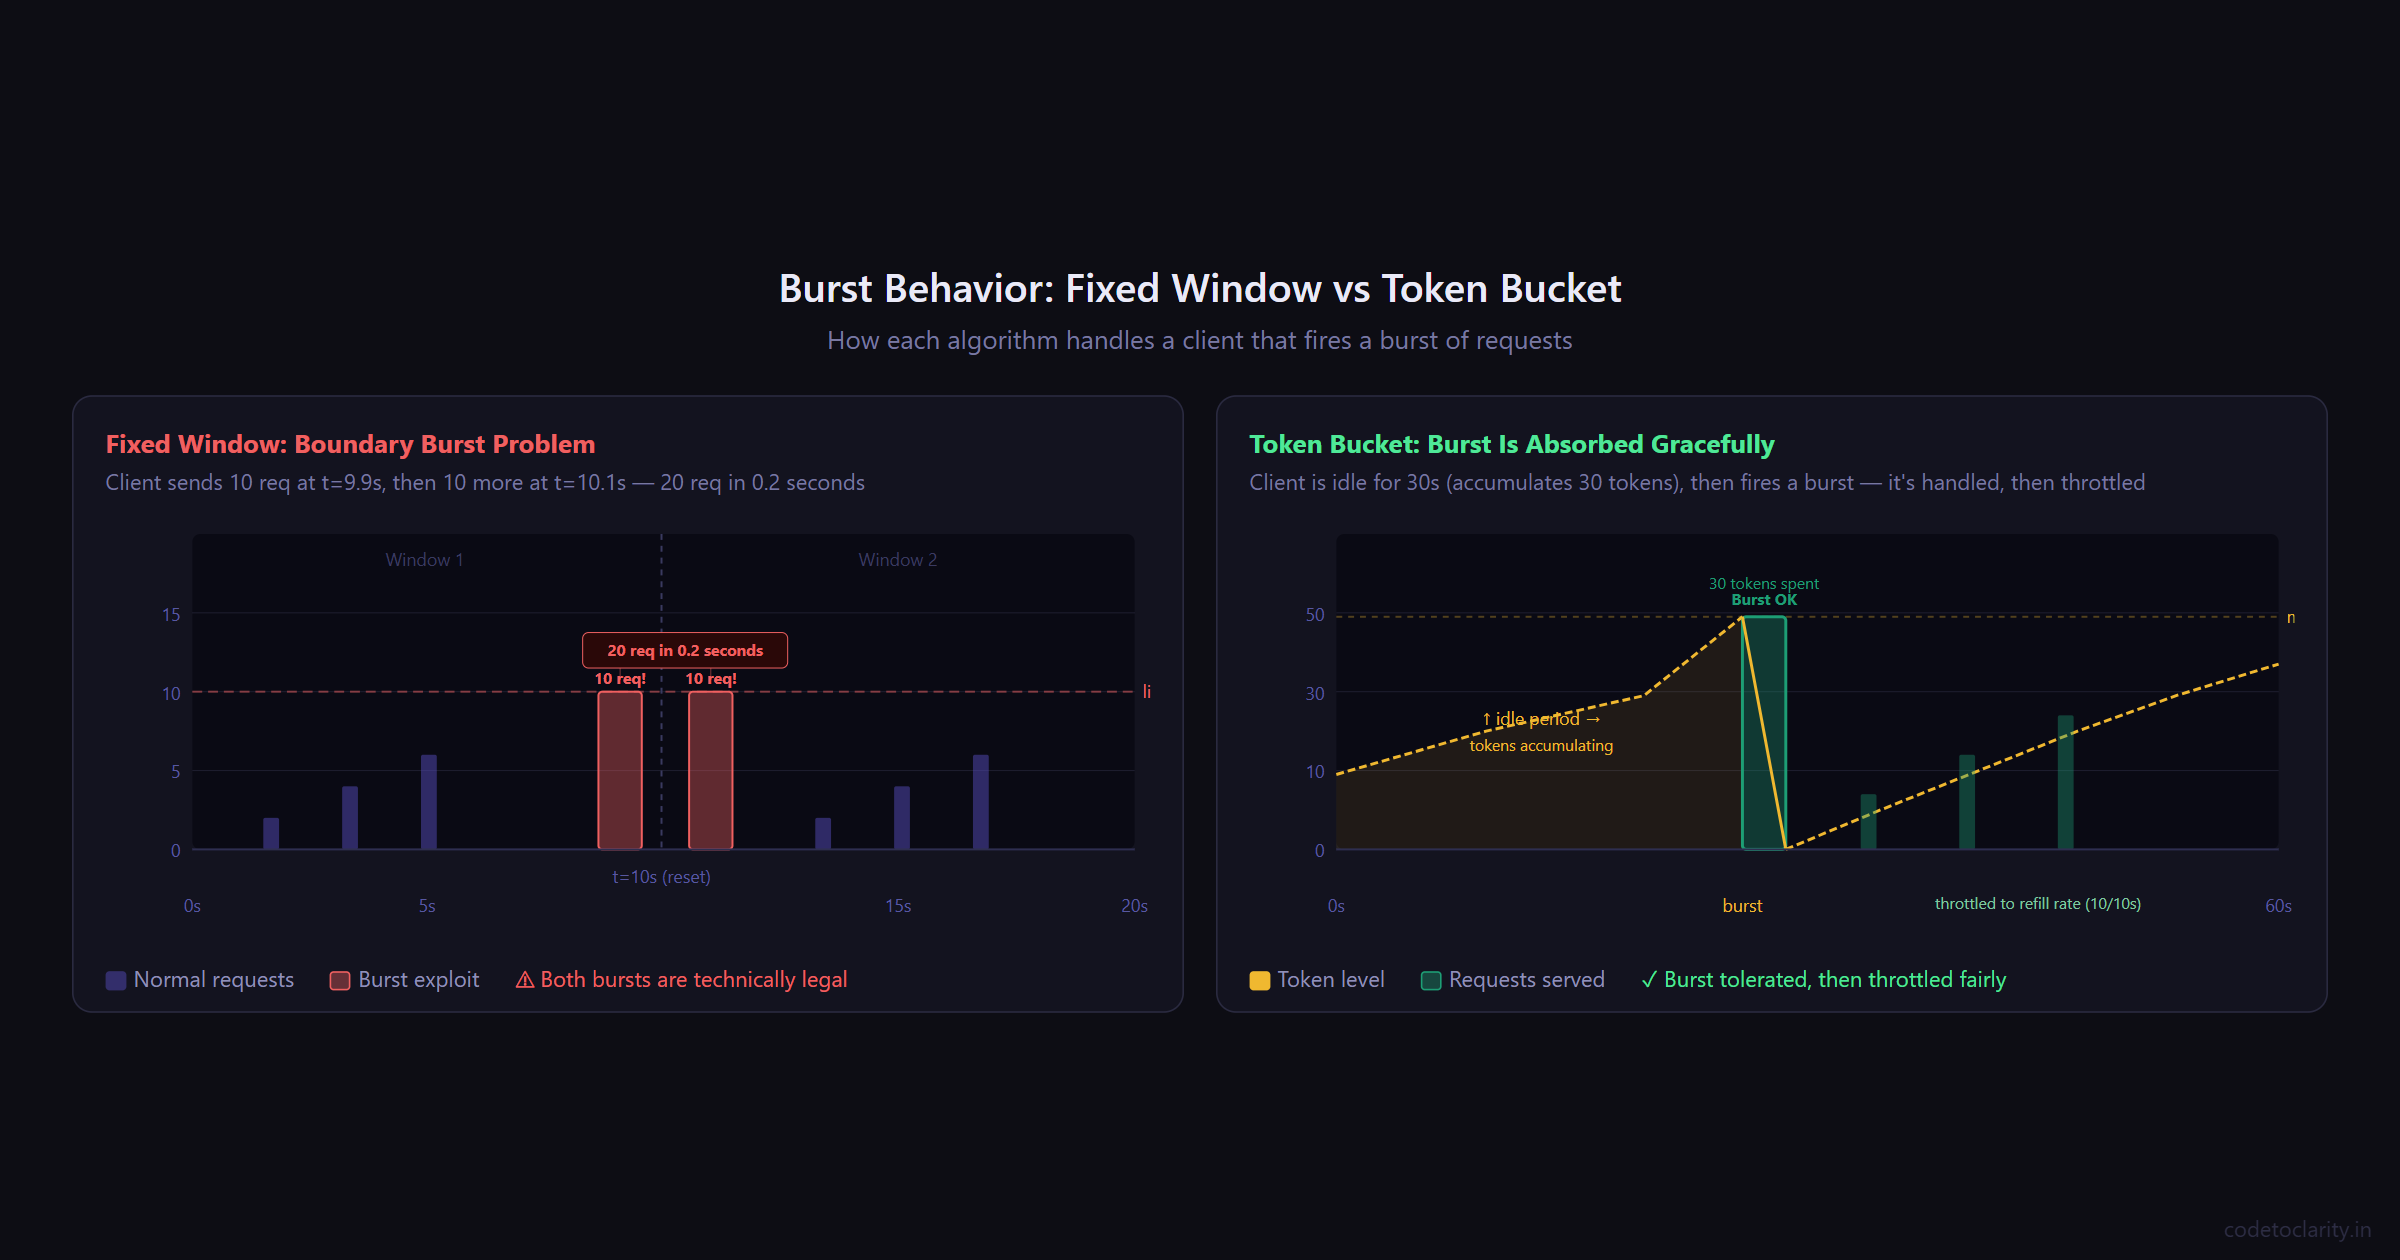
The catch: Fixed windows have a well-known "boundary burst" problem. A client can legally make 10 requests at 9.9 seconds into window #1, and then another 10 requests at 0.1 seconds into window #2. That's 20 requests in under a second, even though your limit says 10 per 10 seconds. For most internal APIs this is fine. For public-facing APIs with stricter requirements, consider the sliding window instead.
Best for: Internal services, admin endpoints, low-risk APIs where simplicity is valued over perfect accuracy.
2. Sliding Window Limiter
The sliding window algorithm is a more nuanced version of fixed window. Instead of a single hard-reset counter, it divides the window into smaller segments and tracks requests across each segment. As time moves forward, old segments expire and their requests free up capacity.
This addresses the boundary burst problem. Because the window "slides" rather than snapping at a fixed boundary, traffic patterns are smoothed out over time.
builder.Services.AddRateLimiter(options =>
{
    options.RejectionStatusCode = StatusCodes.Status429TooManyRequests;

    options.AddSlidingWindowLimiter("codetoclarity-sliding", limiterOptions =>
    {
        limiterOptions.PermitLimit = 10;
        limiterOptions.Window = TimeSpan.FromSeconds(10);
        limiterOptions.SegmentsPerWindow = 5;
        limiterOptions.QueueProcessingOrder = QueueProcessingOrder.OldestFirst;
        limiterOptions.QueueLimit = 3;
    });
});
With 5 segments in a 10-second window, each segment covers 2 seconds. Requests that came in during older segments get "released" as those segments expire. The result is a much more accurate limit that prevents clients from gaming the window boundary.
This is the approach Cloudflare uses for their rate limiting, and they've reported accuracy within 0.003% error across hundreds of millions of requests.
Best for: Public-facing APIs, authentication endpoints, anything where consistency and fairness matter more than raw simplicity.
3. Token Bucket Limiter
The token bucket algorithm works differently from window-based approaches. Picture a bucket that holds tokens. Tokens are added to the bucket at a steady rate up to a maximum capacity. Each incoming request consumes one token. If the bucket is empty, the request is rejected. If the client goes quiet for a while, tokens accumulate, allowing a short burst when they come back.
This is why token bucket is considered the best general-purpose algorithm for developer-facing APIs. It accommodates realistic usage patterns where clients might be idle for a while and then send a cluster of requests, like a user opening a dashboard that loads five widgets simultaneously.
builder.Services.AddRateLimiter(options =>
{
    options.RejectionStatusCode = StatusCodes.Status429TooManyRequests;

    options.AddTokenBucketLimiter("codetoclarity-token", limiterOptions =>
    {
        limiterOptions.TokenLimit = 50;
        limiterOptions.ReplenishmentPeriod = TimeSpan.FromSeconds(10);
        limiterOptions.TokensPerPeriod = 10;
        limiterOptions.AutoReplenishment = true;
        limiterOptions.QueueProcessingOrder = QueueProcessingOrder.OldestFirst;
        limiterOptions.QueueLimit = 5;
    });
});
In this setup, the bucket holds up to 50 tokens and refills by 10 tokens every 10 seconds. A fresh client starts with 50 tokens and can burst through them. After that, they're capped at 10 requests per 10-second replenishment cycle. Setting AutoReplenishment to true lets an internal timer handle the refill automatically.
Amazon API Gateway and Stripe both use variations of the token bucket algorithm for their rate limiting, which speaks to how well it maps to real-world API usage.
Best for: APIs with variable usage patterns, high-traffic consumer products, any scenario where short bursts should be tolerated while the average rate stays controlled.
4. Concurrency Limiter
The concurrency limiter is fundamentally different from the other three. It doesn't care about time windows or token refills. It simply limits how many requests can be processed simultaneously at any given moment.
This is useful when your bottleneck isn't request frequency but resource contention. If your endpoint calls a downstream service that can only handle 5 concurrent connections, a concurrency limiter ensures you never exceed that.
builder.Services.AddRateLimiter(options =>
{
    options.RejectionStatusCode = StatusCodes.Status429TooManyRequests;

    options.AddConcurrencyLimiter("codetoclarity-concurrency", limiterOptions =>
    {
        limiterOptions.PermitLimit = 5;
        limiterOptions.QueueProcessingOrder = QueueProcessingOrder.OldestFirst;
        limiterOptions.QueueLimit = 10;
    });
});
Here, only 5 requests can be in-flight at any given moment. Additional requests queue up (up to 10) and get processed as slots open. There's no time component. The slot frees up the moment the in-progress request completes.
Best for: Endpoints that call external services with connection limits, long-running operations like file processing or report generation, database-heavy routes that can't handle high concurrency.
Applying Rate Limiting to Your Endpoints
Defining policies is only half the job. You also need to attach them to your actual endpoints.
Using Controllers
For controller-based APIs, use the [EnableRateLimiting] and [DisableRateLimiting] attributes. You can apply them at the controller level (affecting all actions) or override at the action level.
[EnableRateLimiting("codetoclarity-fixed")]
[ApiController]
[Route("api/[controller]")]
public class ProductsController : ControllerBase
{
    private readonly IProductService _codetoclarityService;

    public ProductsController(IProductService codetoclarityService)
    {
        _codetoclarityService = codetoclarityService;
    }

    // Inherits the fixed window policy from the controller
    [HttpGet]
    public async Task<IActionResult> GetAll()
    {
        var products = await _codetoclarityService.GetAllAsync();
        return Ok(products);
    }

    // Overrides with the token bucket policy for search
    [HttpGet("search")]
    [EnableRateLimiting("codetoclarity-token")]
    public async Task<IActionResult> Search([FromQuery] string query)
    {
        var results = await _codetoclarityService.SearchAsync(query);
        return Ok(results);
    }

    // Explicitly excluded from rate limiting (e.g., health check)
    [HttpGet("ping")]
    [DisableRateLimiting]
    public IActionResult Ping() => Ok("pong");
}
The layering here is deliberate: the controller sets a default policy, individual actions can override it, and [DisableRateLimiting] is your escape hatch for things like health endpoints that should never be blocked.
Using Minimal APIs
For Minimal API style, chain RequireRateLimiting onto your endpoint definitions:
app.MapGet("/api/products", async (IProductService codetoclarityService) =>
{
    var products = await codetoclarityService.GetAllAsync();
    return Results.Ok(products);
})
.RequireRateLimiting("codetoclarity-token");

app.MapPost("/api/products", async (IProductService codetoclarityService, CreateProductRequest request) =>
{
    var result = await codetoclarityService.CreateAsync(request);
    return Results.Created($"/api/products/{result.Id}", result);
})
.RequireRateLimiting("codetoclarity-fixed");
You can also apply a policy globally so all endpoints inherit it without individual decoration:
builder.Services.AddRateLimiter(options =>
{
    options.GlobalLimiter = PartitionedRateLimiter.Create<HttpContext, string>(context =>
        RateLimitPartition.GetFixedWindowLimiter(
            partitionKey: context.User.Identity?.Name ?? context.Request.Headers.Host.ToString(),
            factory: _ => new FixedWindowRateLimiterOptions
            {
                PermitLimit = 100,
                Window = TimeSpan.FromMinutes(1),
                AutoReplenishment = true
            }
        )
    );

    options.RejectionStatusCode = StatusCodes.Status429TooManyRequests;
});
This global limiter partitions by username (for authenticated users) or hostname (for anonymous ones), making it a great starting point for most applications.
For the full documentation on these APIs, see the ASP.NET Core rate limiting middleware docs on Microsoft Learn.
What Happens When a Request Is Rejected?
When a request is rejected, your client receives a 429 Too Many Requests response. Depending on your setup, requests might also be queued temporarily rather than outright rejected.
It's good practice to handle rejections explicitly by returning useful headers that tell the client when they can retry. You can hook into the OnRejected callback for this:
builder.Services.AddRateLimiter(options =>
{
    options.RejectionStatusCode = StatusCodes.Status429TooManyRequests;

    options.OnRejected = async (context, cancellationToken) =>
    {
        context.HttpContext.Response.Headers["Retry-After"] = "10";

        await context.HttpContext.Response.WriteAsync(
            "Too many requests. Please wait before retrying.",
            cancellationToken
        );
    };

    options.AddFixedWindowLimiter("codetoclarity-fixed", limiterOptions =>
    {
        limiterOptions.PermitLimit = 10;
        limiterOptions.Window = TimeSpan.FromSeconds(10);
    });
});
The Retry-After header is a standard HTTP header that tells the client how many seconds to wait before trying again. Good clients respect it. Great APIs send it.
Things to Keep in Mind
A few practical notes before you ship this to production:
Memory is the storage layer. By default, ASP.NET Core's built-in rate limiter stores counters in memory. This means in a load-balanced setup with multiple instances, each instance tracks limits independently. A client hitting three different servers could make 3x as many requests as intended. If you need consistent rate limiting across instances, you'll need a distributed cache like Redis. The community library AspNetCoreRateLimit supports Redis-backed storage if you need that level of coordination.
Load test before going live. The Microsoft documentation explicitly recommends stress testing your rate limiting configuration before deploying to production. Tools like Apache JMeter can simulate the kind of traffic patterns you need to handle.
Rate limiting is not a DDoS solution. It helps against application-layer abuse, but a distributed volumetric attack will overwhelm your servers before the rate limiter ever engages. Use a CDN or cloud-based DDoS protection service in front of your application for that kind of threat.
Queue size matters. Setting QueueLimit to 0 disables queuing entirely — rejected requests get a 429 immediately. A non-zero queue limit adds latency tolerance at the cost of memory. Pick based on the nature of your endpoints.
Quick Algorithm Cheatsheet
| Algorithm | Time Component | Burst Tolerance | Best For |
|---|---|---|---|
| Fixed Window | Yes (hard reset) | Medium (boundary exploit possible) | Internal APIs, simple use cases |
| Sliding Window | Yes (smooth) | Low (more accurate) | Public APIs, auth endpoints |
| Token Bucket | Yes (accumulates) | High (by design) | Consumer APIs, variable usage patterns |
| Concurrency | No | N/A | Resource-constrained endpoints |
Wrapping Up
Rate limiting is one of those features that feels optional until it isn't. Adding it after the fact, when you're already firefighting a spike, is painful. Adding it early, before you need it, is just a few lines of config.
ASP.NET Core gives you four solid algorithms out of the box, each suited to different scenarios. Use fixed window when you want simplicity. Use sliding window when you need fairness. Reach for token bucket when your users have variable usage patterns. And remember concurrency limiter when the constraint is parallel connections rather than request frequency.
The real skill is understanding what you're protecting and why. Once that's clear, picking the right algorithm becomes straightforward.

Kishan Kumar
Software Engineer / Tech Blogger
A passionate software engineer with experience in building scalable web applications and sharing knowledge through technical writing. Dedicated to continuous learning and community contribution.