
The ASP.NET Core Options Pattern: Stop Reading Config Like It's 2015
Stop injecting IConfiguration everywhere. Learn how the ASP.NET Core Options Pattern gives you type-safe, validated, reloadable config and which interface to actually use in production.
Have you ever experienced the dreaded 3 AM production incident where your perfectly compiling ASP.NET Core application crashes right on startup? Or worse, it starts up just fine, but an integration with a third-party payment gateway fails silently for hours because of a simple typo in your appsettings.json file?
If you are a .NET developer who frequently injects IConfiguration directly into your services and relies on magic string indexers like _configuration["PaymentSettings:ApiKey"], you are walking on a tightrope. This approach treats your application's configuration as an untyped, unvalidated dictionary of strings, exposing you to runtime crashes and security vulnerabilities.
In modern ASP.NET Core development, there is a much better way. It is called the Options Pattern.
The Options Pattern acts as a bridge between the raw, string-based configuration files and strongly-typed C# objects. It allows you to validate your configuration on startup, reload settings on the fly without restarting your application, and ensure that your services only have access to the exact configuration data they need.
In this comprehensive guide, we are going to master the Options Pattern. We will start from the very basics and work our way up to advanced scenarios like data validation, real-time reloading, named options, and dynamically configuring options using dependency injection. Let's dive in and stop reading config like it's 2015.
The Danger of Raw IConfiguration
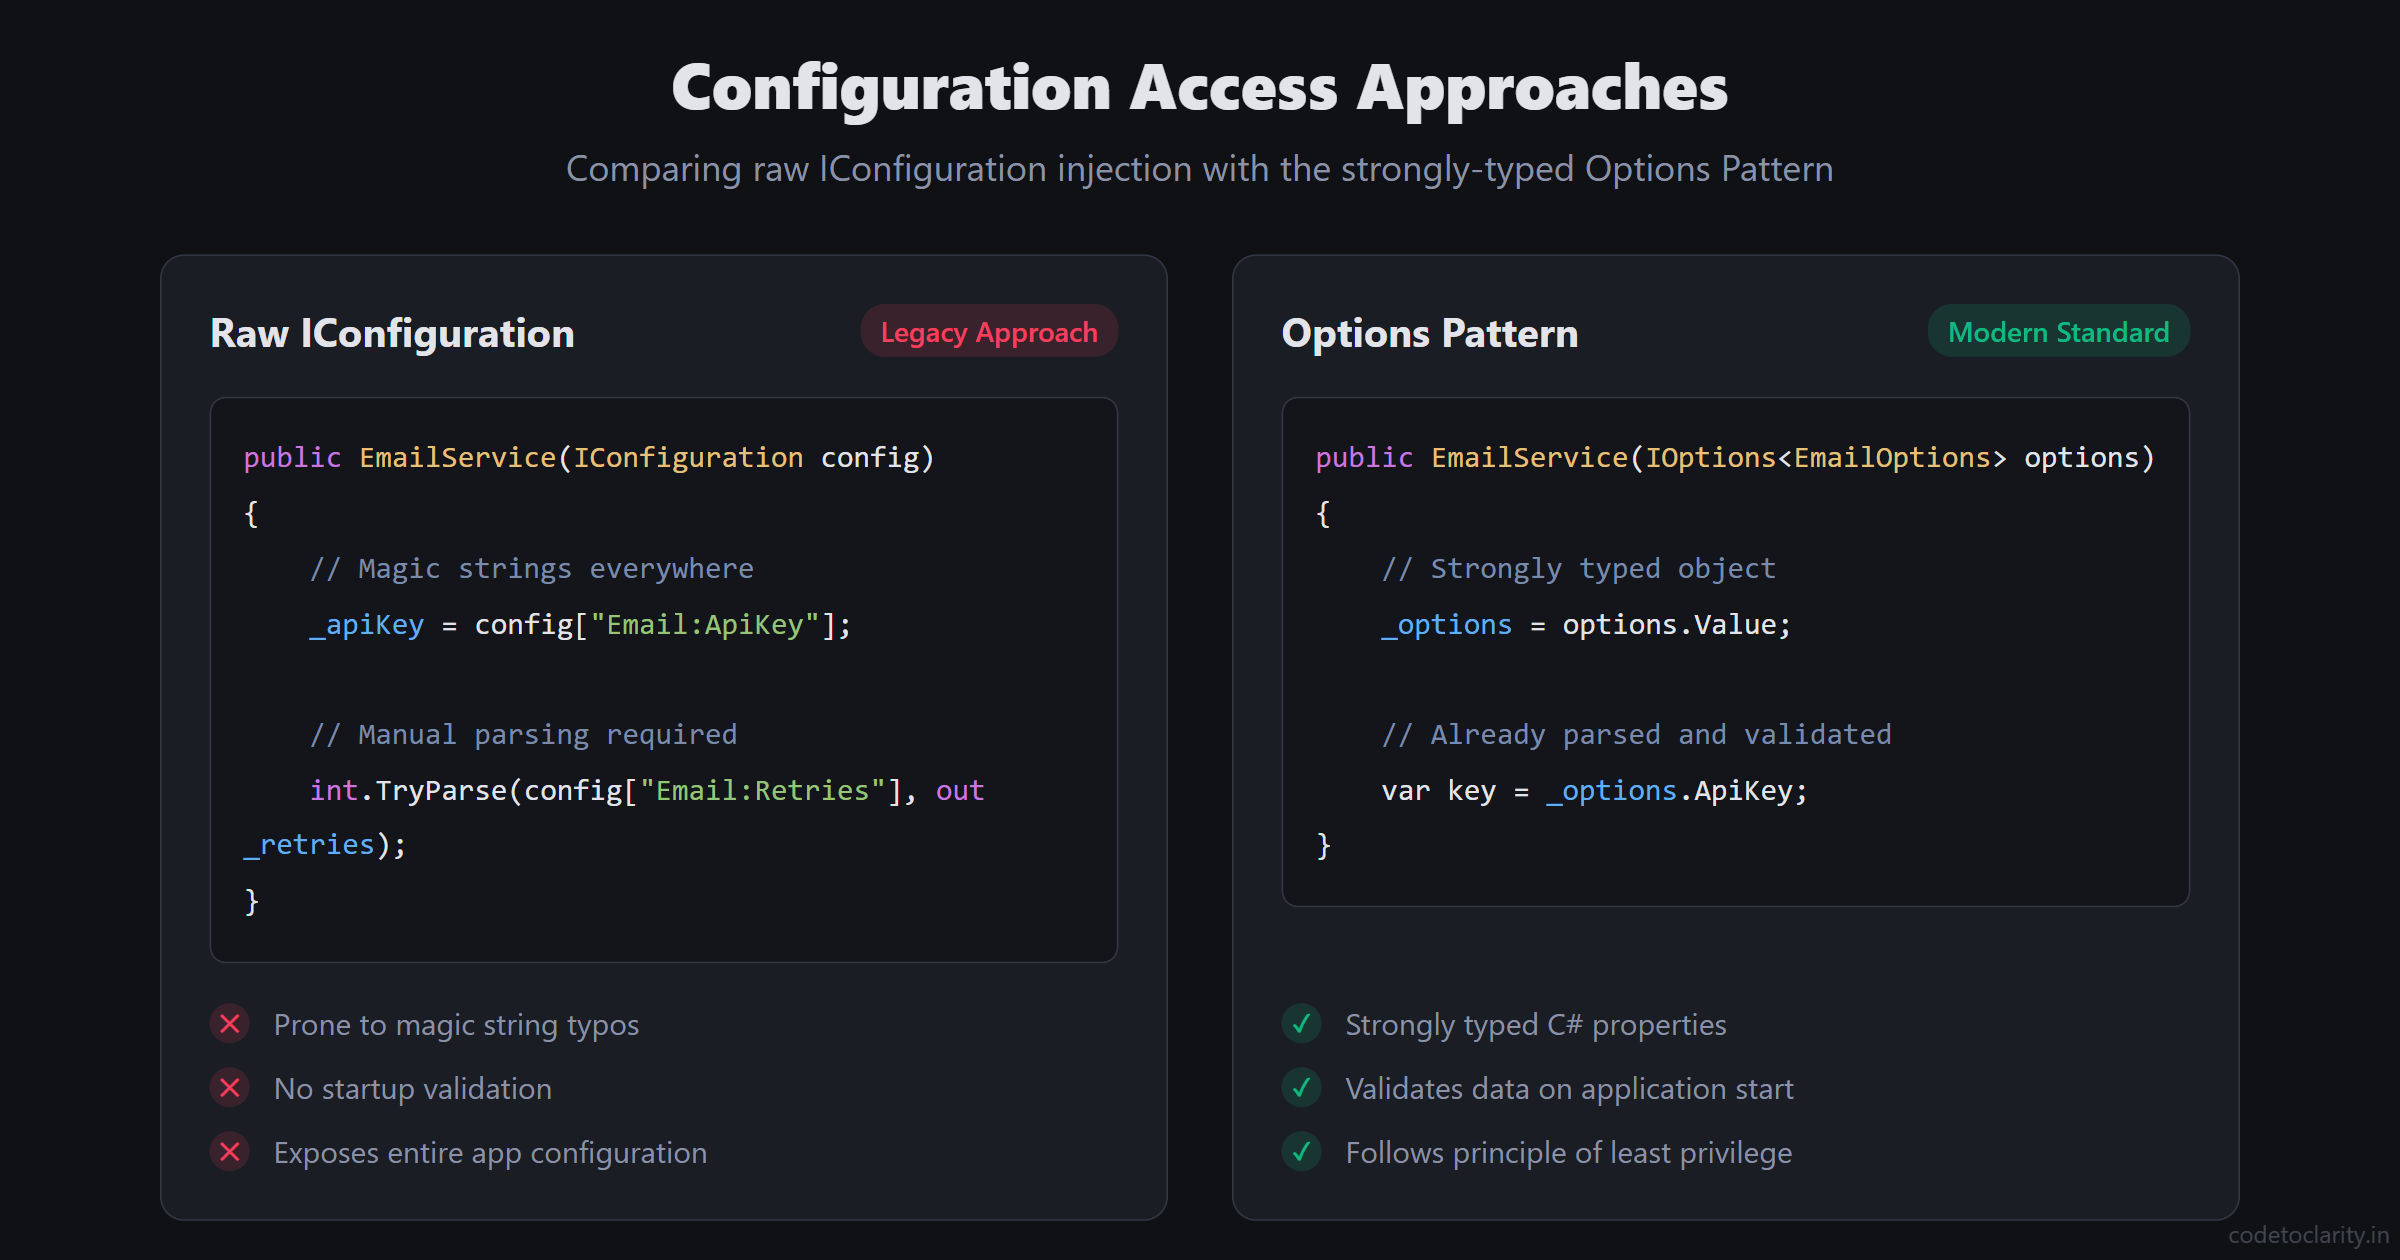
When beginners start learning ASP.NET Core, the first technique they usually learn for reading configuration settings is to inject the IConfiguration interface directly into their controllers or services.
Consider a simple EmailService that needs to read a SendGrid API key and a sender address from appsettings.json:
{
  "EmailSettings": {
    "ApiKey": "SG.YourApiKeyHere",
    "SenderAddress": "hello@codetoclarity.in",
    "MaxRetries": 3
  }
}
If we use raw IConfiguration, our service might look like this:
public class EmailService
{
    private readonly string _apiKey;
    private readonly string _senderAddress;
    private readonly int _maxRetries;

    public EmailService(IConfiguration configuration)
    {
        _apiKey = configuration["EmailSettings:ApiKey"];
        _senderAddress = configuration["EmailSettings:SenderAddress"];

        // We have to parse this manually!
        if (!int.TryParse(configuration["EmailSettings:MaxRetries"], out _maxRetries))
        {
            _maxRetries = 1; // Default fallback
        }
    }

    public async Task SendEmailAsync(string to, string subject, string body)
    {
        // Email sending logic...
    }
}
While this code technically works, it introduces several severe architectural flaws as your application grows in complexity:
- The Magic String Problem: The strings
"EmailSettings:ApiKey"and"EmailSettings:SenderAddress"are hardcoded. If another developer refactors theappsettings.jsonfile and renames"EmailSettings"to"Notifications", your C# code will still compile perfectly. However, at runtime,configuration["EmailSettings:ApiKey"]will silently returnnull. (If you have read our deep dive on why NULL is the billion dollar mistake, you know exactly how dangerous this is.) - Lack of Type Safety:
IConfigurationreturns everything as a string. If you have an integer setting likeMaxRetriesor a boolean likeEnableLogging, you are forced to manually parse and convert these values, cluttering your business logic with configuration boilerplate. - Zero Validation: What happens if the
ApiKeyis accidentally left empty in the production environment variables? RawIConfigurationhas no mechanism to warn you. Your application will start successfully, accept user traffic, and then throw exceptions when it actually tries to send an email. - Violation of the Principle of Least Privilege: When you inject
IConfigurationinto theEmailService, that service now has unrestricted access to your entire application configuration. It can read your database connection strings, your JWT secret keys, and your third-party webhook tokens. A well-designed service should only have access to the specific data it needs to perform its job. - Testing Friction: Unit testing the
EmailServicenow requires you to mock theIConfigurationinterface, set up in-memory configuration providers, and simulate a configuration tree. It is a massive headache for something that should be simple.
The Options Pattern was explicitly designed to solve every single one of these problems. Let's see how.
Step 1: Defining the Options Class
The foundation of the Options Pattern is a Plain Old C# Object (POCO) that perfectly mirrors the structure of your configuration section in appsettings.json.
Instead of pulling individual strings out of a dictionary, we define a class that represents our email settings:
public class EmailOptions
{
    public const string SectionName = "EmailSettings";

    public string ApiKey { get; set; } = string.Empty;
    public string SenderAddress { get; set; } = string.Empty;
    public int MaxRetries { get; set; } = 3; // We can easily set default values!
}
Notice that we added a const string SectionName. This is a widely adopted best practice. By defining the section name as a constant on the class itself, we eliminate the risk of making a typo when we register the configuration in Program.cs.
Also, look at how clean this is. The MaxRetries property is an int. We don't have to parse it; the ASP.NET Core configuration binder handles the type conversion for us automatically.
Step 2: Registering and Binding the Configuration
Now that we have our EmailOptions class, we need to instruct the ASP.NET Core Dependency Injection (DI) container to bind it to the data in appsettings.json.
Open your Program.cs file (or Startup.cs if you are on an older version of .NET) and add the following code before builder.Build():
// The modern, fluent approach
builder.Services.AddOptions<EmailOptions>()
    .BindConfiguration(EmailOptions.SectionName);
When the application starts, the configuration binder looks for the "EmailSettings" section in your configuration providers (which includes appsettings.json, environment variables, Azure Key Vault, etc.). It matches the JSON keys to the properties on your EmailOptions class and populates them.
If you are using an older version of ASP.NET Core, you might see the legacy syntax:
// The older approach
builder.Services.Configure<EmailOptions>(
    builder.Configuration.GetSection(EmailOptions.SectionName));
While both methods work, the AddOptions<T>().BindConfiguration() syntax is generally preferred in modern .NET because it allows you to chain validation methods fluently, as we will see shortly.
Step 3: Consuming Options with IOptions<T>
With the configuration bound and registered, how do we actually use it in our EmailService?
We do not inject the EmailOptions class directly. Instead, we inject a wrapper interface called IOptions<T>.
public class EmailService
{
    private readonly EmailOptions _emailOptions;

    public EmailService(IOptions<EmailOptions> options)
    {
        _emailOptions = options.Value;
    }

    public async Task SendEmailAsync(string to, string subject, string body)
    {
        Console.WriteLine($"Sending email from: {_emailOptions.SenderAddress}");
        Console.WriteLine($"Using API Key: {_emailOptions.ApiKey}");
        Console.WriteLine($"Will retry up to {_emailOptions.MaxRetries} times.");

        // Email sending logic...
    }
}
Look at how much cleaner the constructor is compared to our raw IConfiguration example!
We inject IOptions<EmailOptions>, access the strongly-typed object via the .Value property, and store it in a read-only field. The EmailService no longer cares where the configuration came from. It doesn't know about JSON files or environment variables. It just receives a validated C# object containing exactly the data it needs and nothing more.
Testing this service is now trivial. You don't need to mock IConfiguration. You can simply use the Options.Create() helper method provided by Microsoft:
var testOptions = Options.Create(new EmailOptions
{
    ApiKey = "TestKey",
    SenderAddress = "test@test.com",
    MaxRetries = 1
});

var emailService = new EmailService(testOptions);
If you want a deeper understanding of how services are injected and instantiated, I highly recommend reading our guide on Transient vs Scoped vs Singleton in .NET. Understanding service lifetimes is a prerequisite for mastering the advanced features of the Options Pattern.
Fail Fast: Adding Validation on Startup
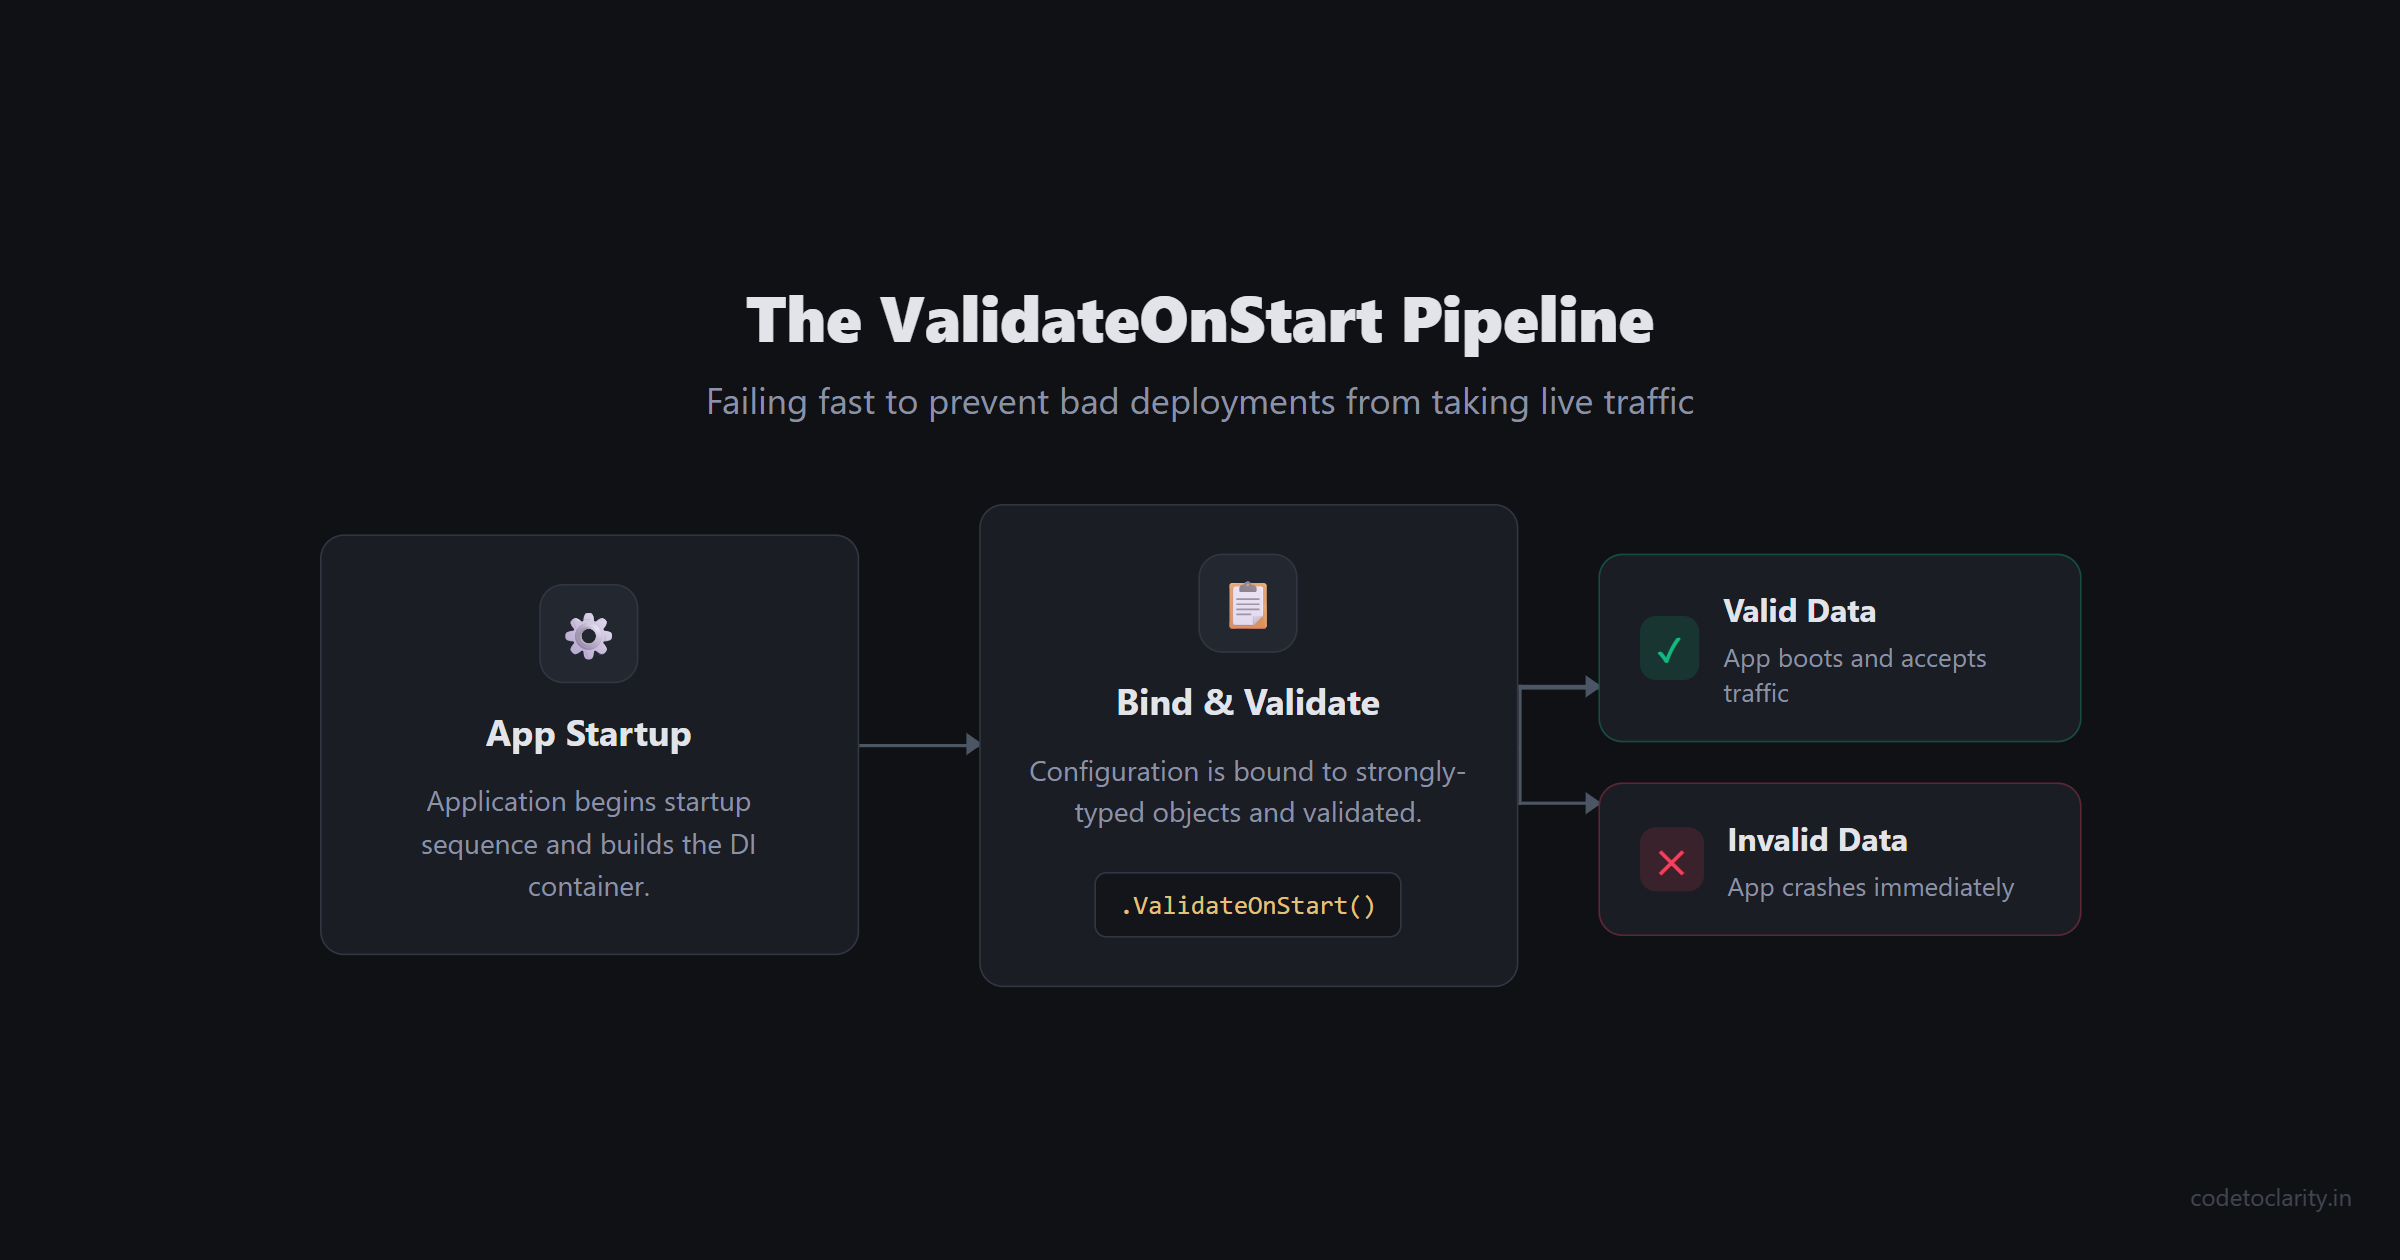
Binding configuration to a strongly-typed class is a massive improvement, but it doesn't prevent bad data from crashing your app. What if a junior developer accidentally deletes the ApiKey from the production configuration before deploying?
By default, the Options Pattern will simply bind an empty string to ApiKey, and your app will fail when it tries to authenticate with SendGrid. We need a way to fail fast to crash the application immediately during startup if the configuration is invalid.
We can achieve this by leveraging standard Data Annotations, just like we use for validating API request models.
Let's update our EmailOptions class:
using System.ComponentModel.DataAnnotations;

public class EmailOptions
{
    public const string SectionName = "EmailSettings";

    [Required(ErrorMessage = "The SendGrid API Key is absolutely required.")]
    [MinLength(10, ErrorMessage = "The API key must be at least 10 characters long.")]
    public string ApiKey { get; set; } = string.Empty;

    [Required]
    [EmailAddress(ErrorMessage = "The sender address must be a valid email format.")]
    public string SenderAddress { get; set; } = string.Empty;

    [Range(1, 5, ErrorMessage = "Max retries must be between 1 and 5.")]
    public int MaxRetries { get; set; } = 3;
}
Now, we need to wire up the validation in Program.cs. This is where the modern fluent registration syntax truly shines:
builder.Services.AddOptions<EmailOptions>()
    .BindConfiguration(EmailOptions.SectionName)
    .ValidateDataAnnotations()
    .ValidateOnStart(); // This is the magic method!
Let's break down what these methods do:
.ValidateDataAnnotations()tells the DI container to inspect the properties of the options class and enforce the[Required],[EmailAddress], and[Range]attributes..ValidateOnStart()is the absolute MVP here. Without this method, validation is evaluated lazily, meaning the exception is only thrown the very first time a service requestsIOptions<EmailOptions>. If that happens in a background cron job that runs once a week, your app will run happily for a week before exploding..ValidateOnStart()forces ASP.NET Core to validate the configuration immediately when the application starts. If it's invalid, the app crashes instantly, preventing a bad deployment from ever taking live traffic.
Advanced Validation with IValidateOptions
Data Annotations are great for simple rules, but what if you have complex, cross-property validation requirements? For example, what if MaxRetries is only allowed to be greater than 3 if the SenderAddress belongs to a specific premium domain?
For these scenarios, you can implement the IValidateOptions<T> interface. This allows you to write custom validation logic in a highly testable, standalone C# class.
public class EmailOptionsValidator : IValidateOptions<EmailOptions>
{
    public ValidateOptionsResult Validate(string? name, EmailOptions options)
    {
        if (options.MaxRetries > 3 && !options.SenderAddress.EndsWith("@codetoclarity.in"))
        {
            return ValidateOptionsResult.Fail("Only internal domains can use high retry limits.");
        }

        return ValidateOptionsResult.Success;
    }
}
You then register this validator as a Singleton in Program.cs:
builder.Services.AddSingleton<IValidateOptions<EmailOptions>, EmailOptionsValidator>();
For more details on writing complex validators, refer to the official Microsoft Documentation on Options validation.
The Big Three: IOptions vs IOptionsSnapshot vs IOptionsMonitor
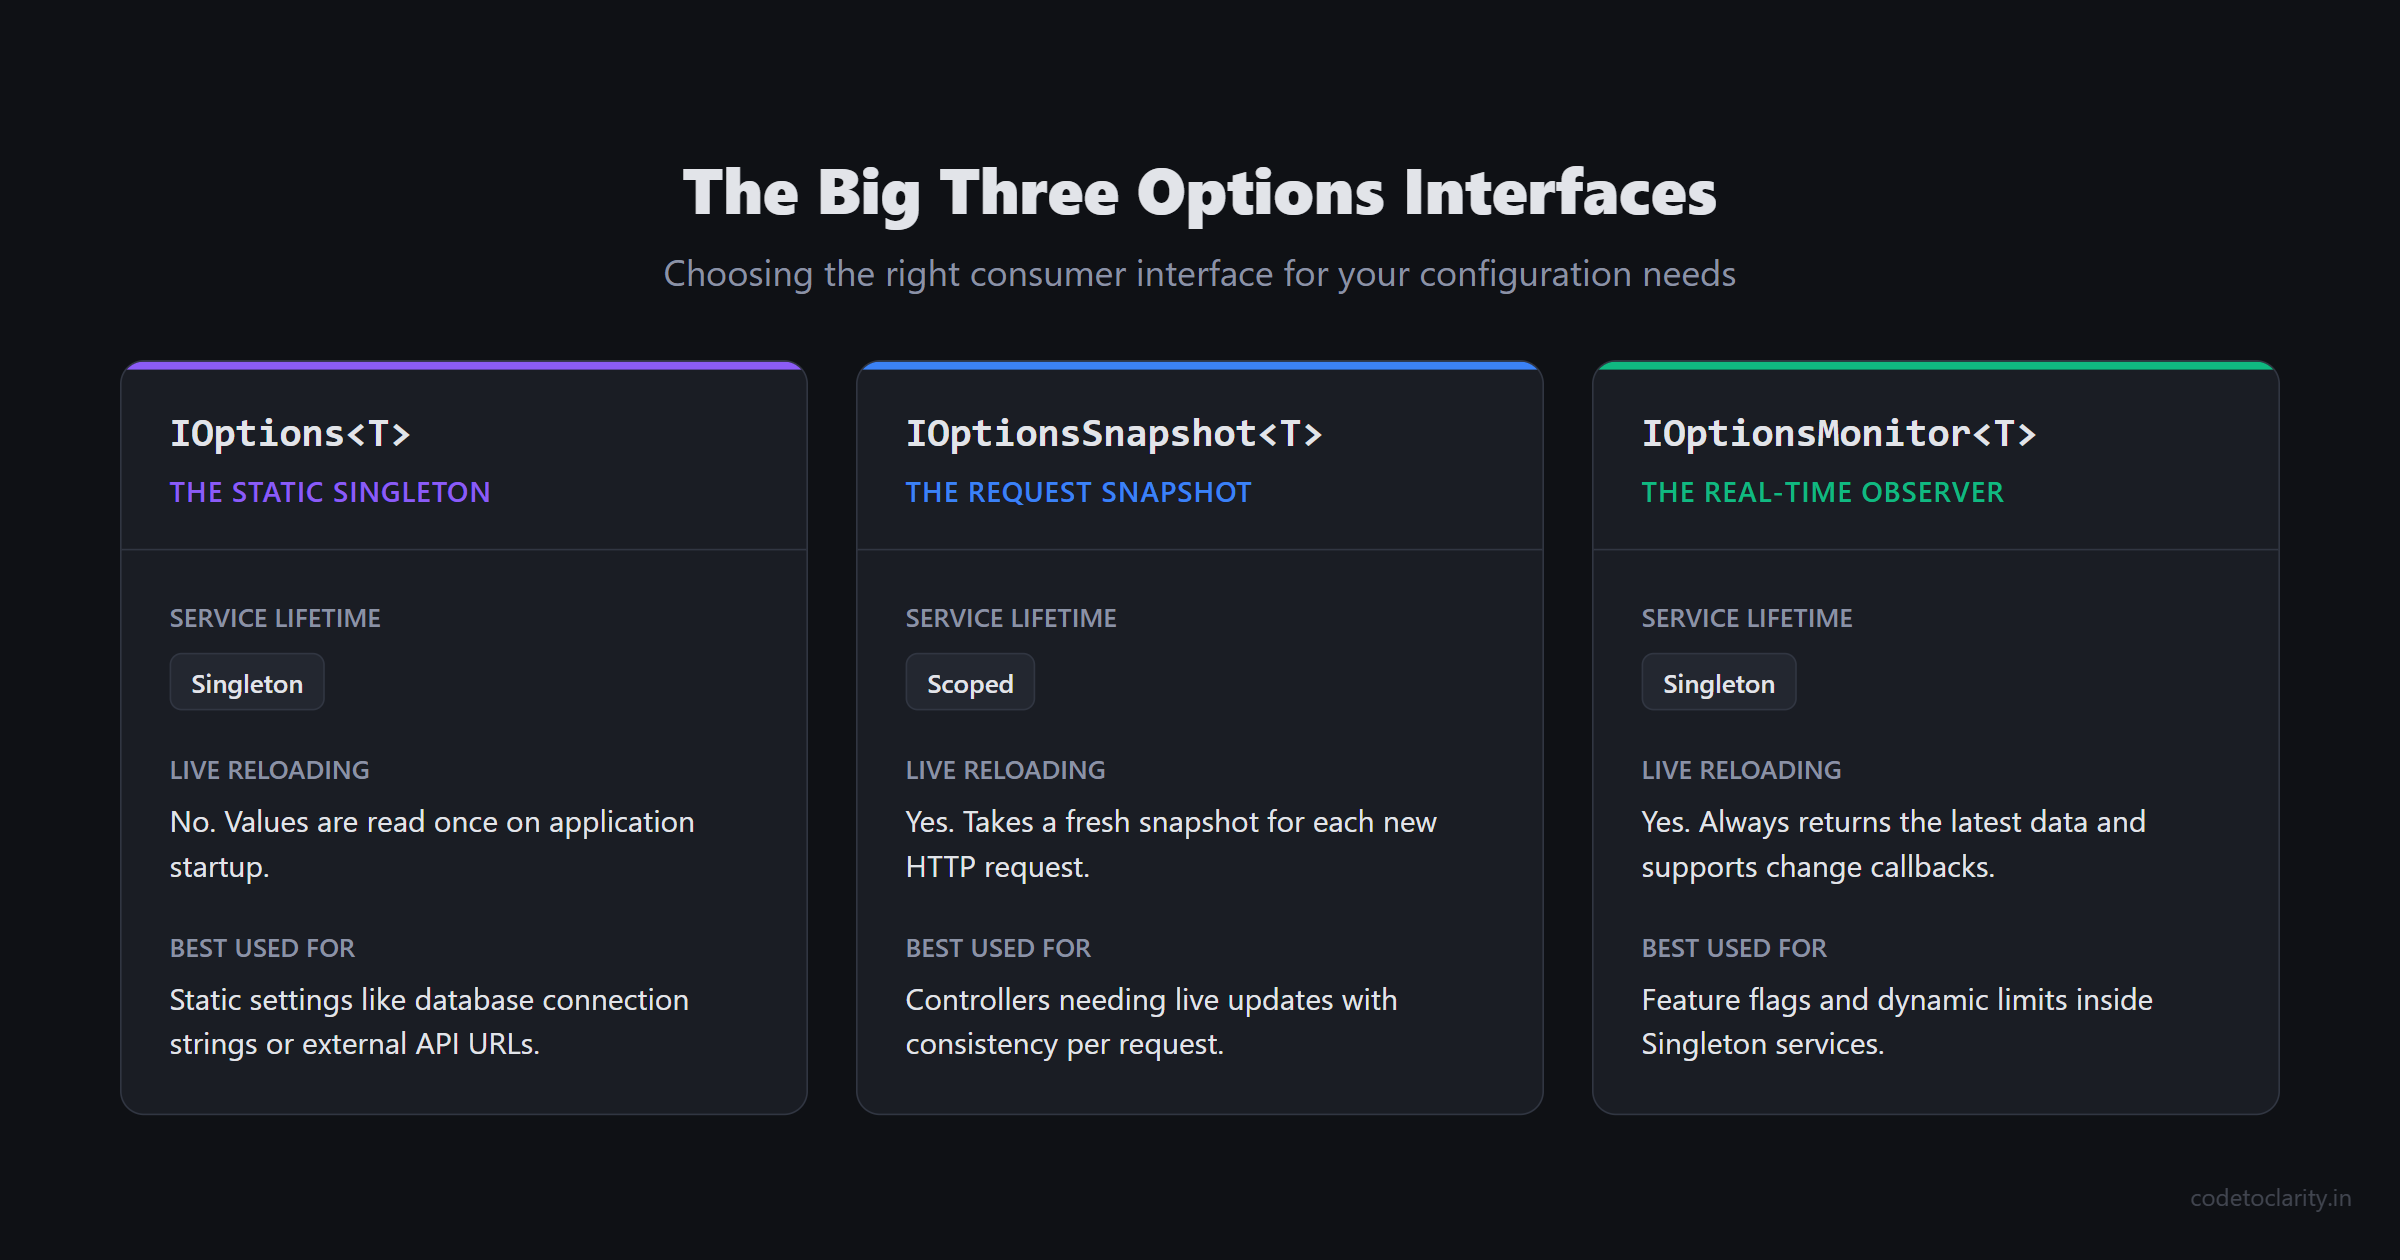
Up to this point, we have only used IOptions<T>. However, ASP.NET Core provides three distinct interfaces for consuming options. Choosing the correct interface is critical, as picking the wrong one can lead to captive dependencies, memory leaks, or stale configuration data.
Let's explore the differences and when to use each.
1. IOptions<T> (The Static Singleton)
When you inject IOptions<T>, it is registered as a Singleton service. The configuration values are read exactly once during application startup and are cached for the entire lifespan of the application.
If a system administrator modifies appsettings.json while the application is running, IOptions<T> will not pick up the changes. You would have to restart the application to see the new values.
When to use it: Use IOptions<T> for configuration that realistically never changes without a deployment, such as database connection strings, external API base URLs, or application names. It is highly performant because the data is read once and cached.
2. IOptionsSnapshot<T> (The Request-Scoped Snapshot)
If you need the ability to update configuration files on the fly without restarting your application, IOptionsSnapshot<T> is the answer. It is registered as a Scoped service.
When a new HTTP request enters your ASP.NET Core pipeline, IOptionsSnapshot<T> takes a fresh snapshot of the current configuration. If the JSON file was updated five minutes ago, the new request will see the updated values. However, throughout the duration of that single request, the configuration remains perfectly consistent, even if the file is modified mid-request.
The Danger Zone: Because IOptionsSnapshot<T> is a Scoped service, you must never inject it into a Singleton service (such as a BackgroundService or a long-lived cache). Doing so creates a captive dependency, and ASP.NET Core will throw a runtime exception. (If you are working with background tasks, be sure to review our guide on BackgroundService vs IHostedService).
When to use it: Use IOptionsSnapshot<T> in controllers or request-scoped services when you want configuration changes to take effect immediately, but you require consistency within a single HTTP request.
3. IOptionsMonitor<T> (The Real-Time Observer)
What if you need real-time configuration updates, but you are inside a Singleton service where IOptionsSnapshot<T> is forbidden? Enter IOptionsMonitor<T>.
IOptionsMonitor<T> is a Singleton service, but its .CurrentValue property always returns the absolute latest configuration data. Furthermore, it implements the Observer pattern, allowing you to attach an event listener that triggers a callback whenever the configuration file is modified!
public class FeatureFlagService
{
    private readonly IOptionsMonitor<FeatureFlags> _monitor;

    public FeatureFlagService(IOptionsMonitor<FeatureFlags> monitor)
    {
        _monitor = monitor;

        // This callback fires the moment appsettings.json is saved!
        _monitor.OnChange(newConfig =>
        {
            Console.WriteLine($"Feature flags dynamically updated! New theme: {newConfig.Theme}");
        });
    }

    public bool IsNewFeatureEnabled()
    {
        // Always reads the freshest value
        return _monitor.CurrentValue.EnableNewFeature;
    }
}
When to use it: Use IOptionsMonitor<T> for feature flags, dynamic rate limiting thresholds, or anytime you need to react to live configuration changes within a Singleton service.
If you want to dive deeper into the internal implementation of these interfaces, the dotnet/runtime GitHub repository contains the full open-source codebase for the Microsoft.Extensions.Options library.
Advanced Flexibility: Named Options
Occasionally, you will encounter a scenario where you need multiple instances of the exact same configuration structure.
Imagine your application interacts with multiple payment gateways. Every gateway requires an ApiUrl and an ApiKey. Instead of creating a StripeOptions class and a PayPalOptions class that have the exact same properties, you can use Named Options.
First, define your JSON configuration:
{
  "PaymentGateways": {
    "Stripe": {
      "ApiUrl": "https://api.stripe.com",
      "ApiKey": "sk_test_123"
    },
    "PayPal": {
      "ApiUrl": "https://api.paypal.com",
      "ApiKey": "paypal_abc"
    }
  }
}
Next, in Program.cs, you register the same PaymentGatewayOptions class multiple times, providing a unique string name for each registration:
builder.Services.AddOptions<PaymentGatewayOptions>("Stripe")
    .BindConfiguration("PaymentGateways:Stripe");

builder.Services.AddOptions<PaymentGatewayOptions>("PayPal")
    .BindConfiguration("PaymentGateways:PayPal");
To consume Named Options, you must use either IOptionsSnapshot<T> or IOptionsMonitor<T>. The standard IOptions<T> interface does not support named instances.
In your service, you call the .Get(name) method to retrieve the specific instance you need:
public class CheckoutService
{
    private readonly PaymentGatewayOptions _stripeConfig;
    private readonly PaymentGatewayOptions _paypalConfig;

    public CheckoutService(IOptionsSnapshot<PaymentGatewayOptions> snapshot)
    {
        // Retrieve the strongly-typed configs by name
        _stripeConfig = snapshot.Get("Stripe");
        _paypalConfig = snapshot.Get("PayPal");
    }

    public void ProcessPayment(string provider)
    {
        var config = provider == "Stripe" ? _stripeConfig : _paypalConfig;
        Console.WriteLine($"Connecting to {config.ApiUrl}...");
    }
}
Named Options dramatically reduce boilerplate code when integrating with multiple identical third-party APIs or configuring multiple named HttpClient instances.
Modifying Options with PostConfigure
Sometimes, the data in your appsettings.json file is incomplete, or you need to derive a configuration value programmatically based on the hosting environment.
ASP.NET Core provides the PostConfigure<T> extension method. As the name implies, this logic runs after all the standard binding and Configure actions have completed. It gives you one final opportunity to mutate the options object before it is injected into your application services.
builder.Services.PostConfigure<EmailOptions>(options =>
{
    // If the developer forgot to set a sender address, generate a fallback
    if (string.IsNullOrWhiteSpace(options.SenderAddress))
    {
        options.SenderAddress = $"noreply@{Environment.MachineName}.internal";
    }

    // Force lower retry counts in development to speed up debugging
    if (builder.Environment.IsDevelopment())
    {
        options.MaxRetries = 1;
    }
});
Using PostConfigure<T> is an excellent way to centralize fallback logic, environment-specific overrides, or complex calculated properties that cannot be easily expressed in a static JSON file.
If you are using .NET 8 or later and managing complex service registrations, combining the Options Pattern with Keyed Services can be incredibly powerful. Check out our guide on .NET 8 Dependency Injection: Keyed Services to see how modern DI techniques elevate your architecture.
Summary
The days of scattering IConfiguration string indexers throughout your codebase should be left in the past. It is an error-prone, untyped approach that makes refactoring terrifying and validation nearly impossible.
The Options Pattern is the professional, enterprise standard for configuration management in ASP.NET Core. By following the principles outlined in this guide, you can ensure that your application is robust, secure, and resilient against configuration errors.
To quickly recap the best practices:
- Always define strongly-typed POCO classes for your configuration sections.
- Use a
const string SectionNameto prevent magic string typos during registration. - Apply Data Annotations and always chain
.ValidateOnStart()to fail fast and prevent bad deployments. - Understand the lifetimes: Use
IOptions<T>for static data,IOptionsSnapshot<T>for scoped requests with live reloads, andIOptionsMonitor<T>for real-time singleton observation. - Leverage Named Options when you have multiple configurations sharing the same structural shape.
- Use
PostConfigure<T>to calculate fallbacks or apply environment-specific overrides.
Implementing the Options Pattern might feel like a bit of extra boilerplate upfront, but the moment .ValidateOnStart() catches a missing production API key before the app even starts, you will realize it is worth its weight in gold.
Happy coding, and may your configurations always bind perfectly!

Kishan Kumar
Software Engineer / Tech Blogger
A passionate software engineer with experience in building scalable web applications and sharing knowledge through technical writing. Dedicated to continuous learning and community contribution.